Welcome to LivingPianos.com. I’m Robert Estrin. Today you’re going to get a deep dive into how to play the Chopin Ballade in G minor. This is a piece that I absolutely love, and so many of you have asked for a tutorial on it. I thought, yes, let’s do it. I even have a complete performance that I’ll reference throughout this discussion. You can find the full performance here.

There are many brilliant performances of this piece available online. I was fortunate enough to hear Vladimir Horowitz perform the Chopin G minor Ballade live on more than one occasion. You can also listen to great interpretations by Arthur Rubinstein and countless others throughout history. Today we’re going to go bit by bit through the first section of the piece. This will be the first installment of a three-part series. As always, feel free to share in the comments which pieces you’d like to see covered in future videos like this.

Let’s get right into it. I’ll start at the beginning and talk about how to approach each of the unique sections in the opening part of the Ballade.

Understanding the Opening Harmony
Right at the beginning there is something fascinating harmonically. The Ballade is, of course, in G minor. So what is that A-flat major chord in first inversion doing there? If you know some music theory, you’ll recognize it as a Neapolitan sixth chord. This is a major triad built on the flatted second degree of the scale. In G minor, you go to the second note of the scale which is A, flatten it to A-flat, build a major triad, A-flat-C-E-flat, and place it in first inversion with C on the bottom, C-E-flat-A-flat. That gives you the Neapolitan sixth. It’s a brilliant harmonic idea. When you consider that Chopin was in his early twenties when he composed this piece, it becomes even more impressive that he completed this work around the time of his twenty-fifth birthday.

Establishing the Pulse and Using Rubato
It is very important to have a steady beat in this piece, but there is also plenty of room for rubato. Rubato is the give and take of tempo. You never gain or lose time overall, but there is subtle speeding up and slowing down, almost like a car cresting a hill. It creates a wonderful expressive effect. The secret to effective rubato is thinking in terms of the long beat. If you try to think of every eighth note individually, rubato would be impossible. Even thinking in quarter notes can feel restrictive. But if you think in larger units such as half notes, you create a slower underlying pulse that allows freedom within the beat. When you maintain that broader pulse, you can shape the tempo expressively without losing the listener. In fact, a good test is this: if someone cannot tap along to your playing, you are probably using too much rubato. There must always be a pulse or the music dies.

Shaping the Opening Phrase
The opening section ends with a long note that must be held long enough to sustain the tension before the tempo change that follows. Count it carefully so the phrase breathes naturally. When the new section begins, it is important not to stretch the rhythm excessively. Sometimes you hear performances where the timing becomes overly flexible, and the music loses its majesty. If you listen to Arthur Rubinstein’s performance, you’ll hear the grandeur that comes from maintaining rhythmic integrity. Let the story unfold naturally. You don’t have to manipulate the theme too much. When played with a strong underlying pulse, the melody reveals its beauty on its own.

Learning the Piece: Memorization First
This tutorial is not about the basic mechanics of learning a piece, since I have many videos devoted to that topic. But I do want to give a brief overview.

You will never play the Chopin G minor Ballade comfortably if you are constantly reading the score. There are enormous jumps later in the piece, particularly in the coda. It is nearly impossible to look at the music and your hands at the same time during passages like that. Instead, read through the piece once or twice to become familiar with it. Because it is so long and complex, you may not read it all in one sitting. This initial reading will also help you decide whether it is the right time for you to tackle this work. If you have not played much Chopin yet, such as preludes, waltzes, or mazurkas, this may not be the best place to start. The Ballade is a monumental and virtuosic composition.

When you begin learning it, take very small sections. Work hands separately first. Learn every detail: notes, rhythm, fingering, phrasing, and expression. Memorize the right hand, then the left hand, and only then put them together. Memorize that as well before moving on. Do not practice the entire piece repeatedly and then try to memorize it later. That approach often ingrains mistakes that are extremely difficult to undo. Study the score carefully from the start.

Bringing Out the Melody
In the next section, the melody must clearly sing above the accompaniment. One excellent practice technique is to play everything staccato except the melody notes. This helps train your hands and ears to distinguish the melodic line. However, if there are half notes in the tenor voice of the left hand, those should be held because they form an important counterline. Practicing in this way creates clarity so that when you return to normal playing, the melody naturally stands out.

Another useful method for bringing out the melody is to practice the accompaniment with a light finger staccato while playing the melody legato. This contrast trains your hands to separate the musical layers. Later you can control dynamics more effectively, allowing the melody to project while the accompaniment remains supportive.

Measuring Your Trills
Even though a trill may sound like a flurry of notes, it must still be measured. Decide exactly how many notes you will play. It does not need to be an enormous number. Choose something comfortable, but make sure you know precisely how many notes there are. That is far better than leaving it to chance and risking an awkward ending to the trill.

Achieving Legato Without Overusing Pedal
Whenever possible, connect notes with your fingers rather than relying on the pedal. For example, when playing octaves, change fingers on black keys. Use the fourth finger, or even the third if your hand is big enough. This enables a smoother legato. Remember that you do not have to connect both notes of the octave. If you connect just one note, the ear will perceive it as legato. Using your fingers to connect notes allows the pedal to serve its true purpose: adding color, not compensating for incomplete technique.

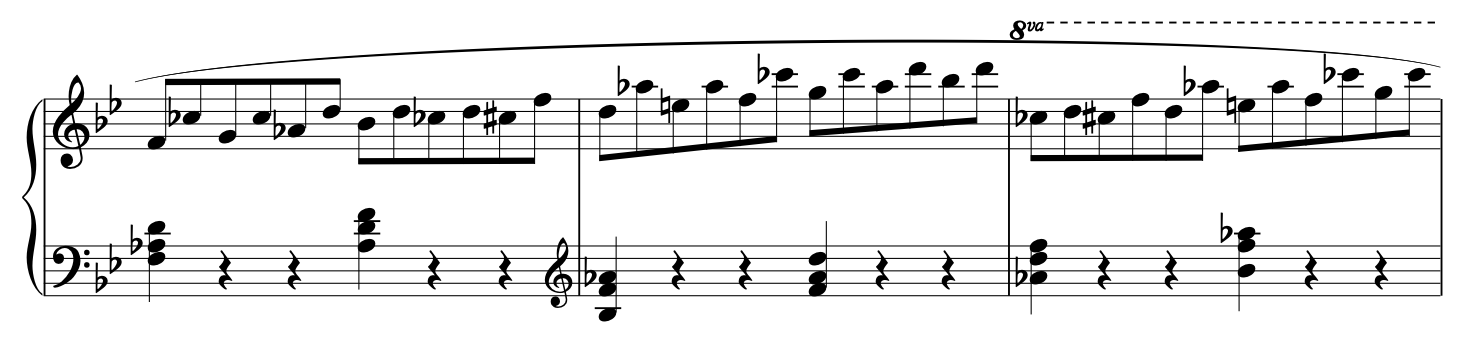
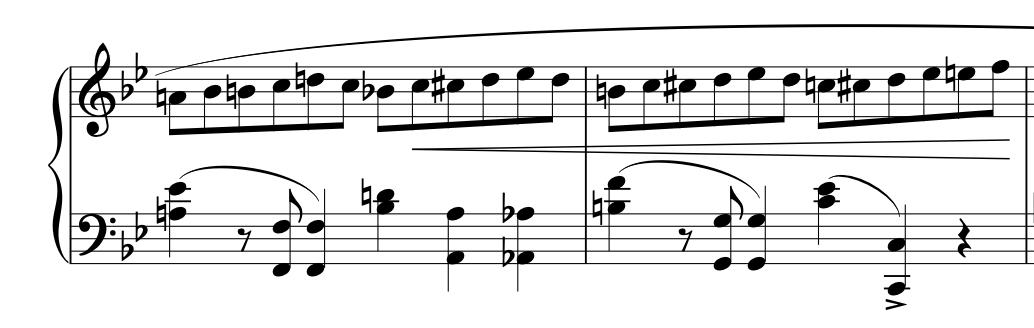
Practicing Fast Passagework
Eventually you encounter the first fast cadenza passage that appears almost suddenly. This can feel intimidating if you are not prepared. There are several effective practice approaches. First, practice only the notes that coincide with the beat, particularly where the hands play together. If that is still difficult, practice the finger patterns within each hand position. Ultimately, piano technique is largely about hand positions and finger patterns. Once these are secure, fluency becomes much easier.

Building Strength and Relaxation
A strong technique requires both strength and relaxation. Sometimes it is beneficial to practice very slowly with a metronome, without pedal, articulating every note clearly from the fingers. This builds strength and awareness of the keyboard. At the same time, you must practice relaxation. Work in note groups, pausing momentarily so your hands are relaxed and positioned over the notes of the next hand position. Gradually reduce the pause until the passage flows smoothly. By working on both strength and relaxation, you build the foundation for a confident performance.

Practicing Without Pedal
Practicing without pedal is incredibly valuable. It removes the veil from your playing and reveals exactly what your fingers are doing. When you work this way, you discover whether your fingering truly connects the notes and if your technique is secure. Many great pianists practice extensively without pedal, including every teacher I have studied with over the years. Slow practice with the score and a metronome is one of the best ways to reinforce accurate playing.

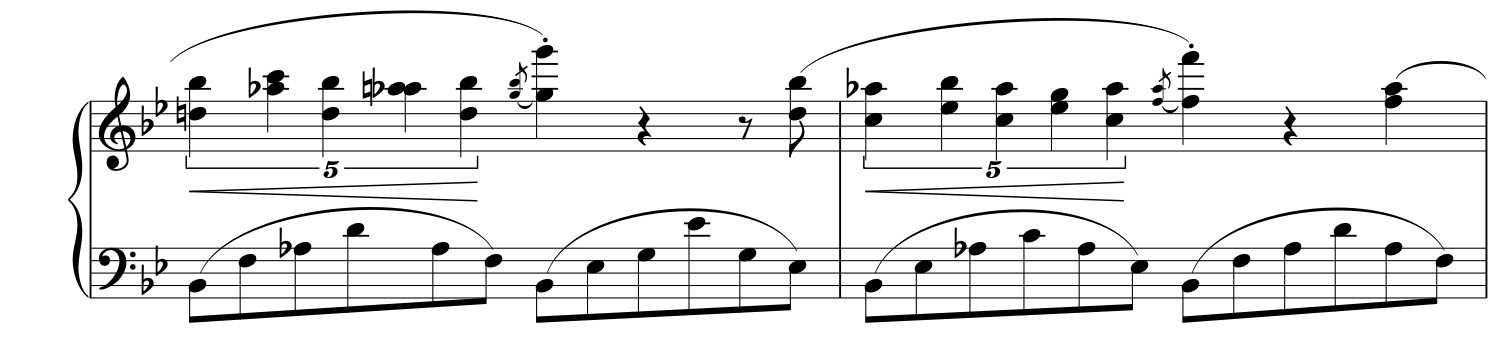
Exploring the Expressive Theme
Later in the section, a stunningly beautiful theme appears. This theme returns later in the Ballade in different forms. Here it is poetic and delicate. Later it reappears heroically in A major. At the repeat of the theme, using the una corda pedal can help create a softer, more intimate tone. Maintain the larger pulse, even if the tempo flexes slightly. The audience should always feel that underlying beat.

Expressive Freedom in Chopin
Chopin’s music allows tremendous interpretive freedom. Some pianists emphasize certain inner voices more than others. Some play the passage very subtly, while others bring those notes out more strongly. There is no single correct approach. Chopin himself did not play his works the same way every time. In fact, he even had different versions of some of his pieces when performing in different countries. So rather than worrying about playing exactly what the composer intended, think of the music as a palette for emotional and sonic exploration.

Wrapping Up the First Section
As this section concludes, the pulse returns clearly. A slight ritardando and the use of the soft pedal can help shape the transition beautifully.

This brings us to the end of the first installment of this lesson.

Recap of Key Practice Strategies
Let’s summarize the main ideas from this first part.
First, read through the piece briefly, then begin memorizing right away in very small sections.
Second, think in terms of the long beat. This gives you freedom for rubato while maintaining a clear pulse.
Third, practice technical passages slowly with the metronome and without pedal to build strength and accuracy.
Fourth, work in note groups and practice relaxation before each time the hands play together.
Finally, isolate hand positions and finger patterns when tackling fast passages.

These methods will help you develop the speed, power, and relaxation necessary to play the Chopin Ballade in G minor successfully.

I hope you’re enjoying this exploration. It’s one of my favorite pieces, and I look forward to hearing your thoughts in the comments here at LivingPianos.com, Your Online Piano Store.

How to Play Chopin’s Ballade No. 1 in G Minor — A Deep Dive

Welcome to LivingPianos.com. I’m Robert Estrin. Today you’re going to get a deep dive into how to play the Chopin Ballade in G minor. This is a piece that I absolutely love, and so many of you have asked for a tutorial on it. I thought, y

Welcome to LivingPianos.com. I’m Robert Estrin. What can you do with a piano that won’t stay in tune? There is a lot to this subject, and I want to share some tips that could really make a difference for your piano.

First, Determine the Cause

The first step is figuring out why the piano isn’t staying in tune. There can be many possible reasons. One of the biggest factors is the environment the piano lives in. Stability of temperature and, humidity can make a huge difference in how well a piano holds its tuning.

The Importance of Regular Tuning

Here is something many people don’t realize. If you go years without tuning your piano and then finally have it tuned, it probably won’t hold very long. In fact, the more often you tune a piano, the more stable it becomes over time. You never save money by putting off tuning. When a piano has drifted far from pitch, the technician may have to tune it twice in a row just to bring it back to the correct pitch level. Even then, that tuning may not hold very long. So two key principles are simple. Provide a stable environment and tune the piano regularly.

How Often Should You Tune Your Piano?

People ask this question all the time. The Piano Technicians Guild often recommends tuning four times a year. Many people are surprised by that number. At a minimum, tuning twice a year is very important because of seasonal changes. When you go from heating to air conditioning and back again, the pitch of the piano can shift. Sometimes the piano might still sound fine, but the entire instrument may have gone flat or even sharp. The secret to tuning stability is staying ahead of those changes. When a piano is tuned consistently, it becomes more stable.

In music conservatories, concert pianos may be tuned every day. The two Steinway pianos on stage at one of my conservatory were tuned daily for so long that technicians told me they almost never found a note out of tune. The instruments had become incredibly stable. At my father’s recording sessions, tuners were present during the entire sessions so when even one unison went out even slightly, they touch it up immediately. My father had his own pianos tuned monthly in his studio because of the heavy teaching and practice they received.

What If the Tuning Pins Are Loose?

Suppose you provide a stable environment and tune the piano regularly, but it still won’t hold. Sometimes the issue is loose tuning pins. There are two main possibilities, and this is where a bit of detective work comes in. If you notice several loose pins forming a straight line, that often indicates a crack in the pinblock. A technician might try installing oversize pins, but this can actually enlarge the crack. In that case, the real solution is rebuilding the piano.

Rebuilding involves removing the strings, lifting out the plate, and crafting a custom pinblock specifically for that piano. The holes for the 220 to 240 tuning pins must be drilled with extremely precise tolerances and angles. After restringing, the piano must be tuned repeatedly until it stabilizes. It is an involved and expensive process.

When the Pins Are Just Slightly Loose

Sometimes the situation is less severe. Instead of a line of loose pins, you may find that a general area of the keyboard has pins that are just a little loose. If there is space between the coils of the string and the plate, a technician may be able to tap the pins slightly deeper into the pinblock to gain more traction. This must be done very carefully. The bottom of the pinblock needs proper support, or the lower layers of wood can be damaged, which would create a serious problem. When done correctly, however, this small adjustment can sometimes solve the issue.

Another possibility involves chemical agents designed to increase the grip between the pin and the pinblock. These compounds are similar to super glue, but they are not actually gluing the pins in place. Instead, they increase the surface contact slightly. The feel of the tuning pins can become a little scratchy rather than smooth, but in some cases this treatment can help a piano hold tuning for years. It can be a practical option if the piano is not worth the expense of a full rebuild but you still want it to stay in tune.

Using Larger Tuning Pins

There is one more option if the pins are generally loose but not failing in a specific line. A technician can sometimes restring the piano using slightly larger tuning pins. Pianos typically start with what are called number two pins. Each step up in size increases the diameter by one thousandth of an inch. Moving from twos to threes or even fours can provide the extra grip needed. This approach allows the existing pinblock to remain in place. The plate does not have to be removed, and a new pinblock does not need to be built.

A Quick Recap

If your piano won’t stay in tune, start with the basics. Provide a stable environment with controlled temperature and humidity. Tune the piano regularly so it gradually becomes more stable. If certain pins are slipping in a straight line, a cracked pinblock may require rebuilding. If the looseness is more general, a technician might tap the pins deeper, use a chemical treatment, or install slightly larger tuning pins. These are all techniques that can sometimes bring a stubborn piano back to reliable tuning stability.

If you have other ideas or experiences with this issue, feel free to share them in the comments here at LivingPianos.com, Your Online Piano Store. I’m Robert Estrin, thanks for joining me.

Piano Tuning Problems? | The REAL Solutions Nobody Tells You

Welcome to LivingPianos.com. I’m Robert Estrin. What can you do with a piano that won’t stay in tune? There is a lot to this subject, and I want to share some tips that could really make a difference for your piano. First, Determine the Cause

Welcome to LivingPianos.com. I’m Robert Estrin. Today I have a really provocative subject for you: Why You Must Learn to Fake at the Piano. Now, if you have ever had a teacher or studied seriously, you have probably been told that faking is the worst thing you can do. You want to play with integrity. You want to honor the score. So how could I possibly tell you that you absolutely must learn how to fake?

The Wall Between Practicing and Performing

I have talked before about the necessity of building a wall between practicing and performing. They are completely different experiences. If you are not clear which one you are doing, you are likely not accomplishing either one effectively.

When you are practicing and something goes wrong, you must stop immediately. Find the place in the score. Identify the correction. Cement the correction. Then go back a bit so you can pass that trouble spot successfully. Finally, return to the beginning of the piece or section and integrate the fix into the larger context. That is how you prevent mistakes from becoming ingrained. You nip them in the bud. But when you are performing, the situation is exactly the opposite. The last thing an audience wants to hear is you practicing while you are supposed to be playing for them.

Why You Must Keep Going in Performance

In performance, if something goes wrong, you must keep going no matter what. You might wonder how great concert pianists can play for hours and seem flawless. Of course, nobody is perfect. There are always finger slips or momentatry memory lapses. The difference is that seasoned artists know how to recover without disrupting the flow.

When I was a child, I had the opportunity to hear the great Arthur Rubinstein in concert for his 80th birthday. I was enthralled. We even got to meet him afterward, and he was incredibly gracious. After the concert, my father mentioned that in the Beethoven sonata Rubinstein had improvised his way through a memory slip. I was shocked. I had no idea anything had gone wrong, and I would guess that the vast majority of the audience did not notice either. Only someone who knew the piece intimately could have detected it. That is the art of faking. It is not about being careless. It is about preserving the musical experience for the listener.

The Danger of Stopping

Think of watching a movie. You are absorbed in the story. If there is a sudden jump cut or the film skips backward even briefly, it is jarring. It takes you out of the magic. The same thing happens in music. The moment you lose time or stop to fix something, even listeners who know nothing about music can feel it. Suddenly they cannot follow the pulse. Instead of enjoying the music, they start worrying about you. That tension replaces enjoyment. As much as you may want to fix the mistake, you must resist that temptation in performance.

Practice Performing

There is practicing. There is performing. And then there is practicing performing. Whenever you sit down at the piano, you should know which one you are doing.

To practice performing, take a piece you feel reasonably secure with and play it through as though you are in concert. Do not stop. No matter what happens, keep going. If you lose your place, keep one hand moving while the other finds its way. Stay in time. Do not go back. Do not skip ahead. Stay where you are in the music and reestablish control. It is far better to simplify or approximate for a moment than to derail the entire performance. You can even record yourself and make a rule that once you start, you cannot stop. This is tremendously valuable training.

Develop Your Ear to Support Recovery

One of the best ways to strengthen this skill is to sing your music. The piano is unique in that you can produce a sound simply by pressing a key. You do not have to hear it internally first. But when you sing, you must hear the pitch before you produce it. As a French horn player, I can tell you that you absolutely have to hear the notes before you play them. Singing builds that connection between your ear and your fingers. If you can sing a melody and have even modest ability to play by ear, you can often find your way through a rough patch without anyone realizing it. Keep counting. Keep the fingers moving. Stay in the moment. Over time, this even enhances your musicianship. I have had occasions where I experienced a brief memory lapse and played by ear to get through it, only to discover afterward, listening to the recording, that I had actually played the correct notes! That comes from improvising and developing a strong connection between what you hear and what you play.

The Secret to Confident Performing

Prepare thoroughly before any performance. Then practice performing. Play for friends. Play for small groups, then larger ones. Use those opportunities to experiment with keeping the flow no matter what happens. When you know you can recover smoothly, much of the fear of performance disappears. And your audience will appreciate a seamless musical experience far more than a technically perfect one interrupted by stops and restarts.

So remember, build that solid wall between practicing and performing. Know which one you are doing. And yes, learn how to fake. If you cultivate your ear, practice performing, and stay committed to the musical flow, your faking can become so seamless that, just like that Rubinstein concert, nobody will be the wiser. That is the lesson for today. Embrace it, and it can be a true game changer in your piano playing.

This is Robert Estrin at LivingPianos.com, Your Online Piano Resource. Thanks so much for joining me.

Why You Must Learn to Fake At The Piano

Welcome to LivingPianos.com. I’m Robert Estrin. Today I have a really provocative subject for you: Why You Must Learn to Fake at the Piano. Now, if you have ever had a teacher or studied seriously, you have probably been told that faking is the

Welcome to LivingPianos.com. I’m Robert Estrin. If you are completely satisfied with your piano playing and are getting exactly the results you want from your practice, then this article may not be for you. But if you are striving for a higher level of refinement, if there is music you have always wanted to play that still feels out of reach, or if you struggle with reading, memorization, or other fundamental skills, then it is time to take a fresh look at how you practice.

Are You Getting the Results You Want?

I have met so many people who are deeply attached to their practice routines. And to be fair, some aspects of routine are beneficial. Simply practicing regularly has tremendous physiological and mental benefits. Just sitting down at the piano consistently is an accomplishment in itself!

But here is the real question. Are you getting the results you want? If not, how will continuing the same routine change that? There is an old saying that insanity is doing the same thing over and over and expecting different results. The same can be true of practicing. If you are repeating the same process every day without meaningful change, you may simply be maintaining your current level rather than growing beyond it.

What Practicing Really Is

Practicing is discovery. It is a learning process. By the end of a practice session, you should have assimilated something you did not have before. If nothing new has been learned or clarified, then it was not truly productive practice. If you are doing exactly the same things every day, it is unrealistic to expect to reach a new level. Growth requires exploration.

Keep What Works, Question What Does Not

Analyze your routine carefully. Some elements may be extremely valuable. For example, starting with slow scales or arpeggios can warm up your hands, help prevent injury, and give you time to listen to the piano’s tone. It allows you to settle into your seat and establish proper position. These are excellent habits. But beyond that, examine what you are doing. If you typically warm up, then play through all your pieces to maintain them, and perhaps do some sight reading, ask yourself honestly: is playing through your pieces actually making them better? Or are you just keeping them at the same level? If it is not improving them, what could you do differently?

Experiment in Your Practice

Don’t be afraid to try things that may seem unusual. If you are accustomed to simply playing through your music, try practicing very slowly without pedal while carefully watching the score. Use a metronome. Change the tempo deliberately. Sometimes playing a piece slightly faster can reveal weak spots. You may find that most of it holds together, except for two or three key sections. Now you have identified exactly where to focus your time. Instead of practicing everything equally, you can zero in on the places that truly need attention. You could spend the same amount of time at the piano and accomplish exponentially more by targeting specific weaknesses.

Practice with Clear Intentions

Another common problem is practicing without a clear purpose. When you are playing through a piece, what exactly are you trying to accomplish? Are you refining details? Refreshing memory? Improving reading? Strengthening memorization? At every moment of practice, you should know the specific skill you are developing.

When learning a new piece, take very small sections and work phrase by phrase. Practice the right hand alone, mastering every detail. Then the left hand alone. Memorize each part. Put the hands together only after each is secure. Connect sections gradually as you go. This approach builds real security in your playing. For pieces you already know, reinforce them by slow practice, without pedal, with a metronome, and with the score. Slow practice is one of the greatest practice techniques you can use.

Listen with Fresh Ears

Listen for different lines in your music. If you always bring out the top melody, listen for a counter melody in the lower voices. Shift your attention to inner parts. Anything that helps you hear your music in a new way can deepen your interpretation.

If you have access to another piano, even a digital piano or a friend’s instrument, try playing your pieces there. A different sound can open new horizons. You may discover colors and balances you never noticed before, which will influence how you approach your own piano.

Play for Other People

One of the most powerful learning experiences is playing for others. When you think a piece is ready, invite friends to listen. Be brave enough to perform. The experience of playing for someone else is completely different from playing alone. Your mental focus changes. Your emotional response changes. You will learn things in that one performance that you could never learn by playing the piece a hundred times by yourself!

Make Practice a Process of Discovery

Do not become a prisoner of your routines. Keep the elements that truly serve you, but remain open to change. Try new approaches. Set clear intentions. Listen deeply. Make every practice session an opportunity for discovery. When you do that, growth becomes inevitable.

Let me know what routines work for you and share them with others here at LivingPianos.com Your Online Piano Resource. – Robert Estrin

Why Your Practice Routine Is Wrong!

Welcome to LivingPianos.com. I’m Robert Estrin. If you are completely satisfied with your piano playing and are getting exactly the results you want from your practice, then this article may not be for you. But if you are striving for a higher

Welcome to LivingPianos.com. I’m Robert Estrin. Today I’m going to take you on a day by day journey of mastering a difficult piano piece. Maybe there’s a piece you’ve always wanted to learn, or perhaps you’re struggling with one right now. By the end of this article, you’ll have a clear idea of the process it takes to truly master challenging music.

First Step: Read Through, But Don’t Overdo It

The very first thing you want to do when studying a piece is to read through it to get an idea of what it’s about. If it’s a long and difficult work, you don’t have to read the whole thing at once. You might read the first section one day, the next section the following day, and so on.

However, once you’ve read through the entire piece a couple of times, no more than three times, you should stop simply reading it.

Why? Because every time you play through a piece, you risk reinforcing mistakes. Even small things that seem insignificant at the time can become deeply ingrained. Perhaps you overlooked a staccato marking. Maybe you used an awkward fingering you intend to change later. Possibly a dynamic is wrong. And of course, there may be wrong notes. Once your hands and ears get used to something, undoing it becomes arduous. It’s far better to avoid learning mistakes in the first place.

Memorize First, Then Build

Instead of practicing endlessly and memorizing later, flip the process. Memorize first. After your initial read through, go back to the beginning and take a tiny section. It doesn’t matter what the piece is. Choose something small enough that you can learn it very quickly. For example, if you’re working on the G minor Ballade of Chopin, you would not try to tackle a large passage at once. Take just a small phrase. Focus on a short segment and examine everything: notes, rhythm, fingering, phrasing, and expression. In other words, learn it correctly from the very first reading. Go very slowly and practice just the right hand. Because the section is small, you can usually memorize it fairly quickly. Get it comfortable and secure. Then do the same with the left hand. Once each hand is memorized and played exactly as you want to hear it, put them together slowly and memorize that as well. Then move on to the next small section, connecting phrases as you go.

Work to the Point of Diminishing Returns

Some passages, especially the most difficult ones, may not reach tempo right away. That’s fine. With each small phrase, work to the point of diminishing returns. Get the right hand secure, then the left hand, then hands together. Memorize each stage.

As the days go by, you’ll notice something interesting. Each time you sit down, you’ll need to refresh what you learned the previous day. But material you learned two or three days ago will start to feel more fluent and secure. Gradually, everything rises in level.

Start With the Hardest Sections

In large works such as the G minor Ballade, it can be extremely helpful to zero in on the most difficult sections first, such as the massive coda. If you leave the hardest part for last, you may learn the entire piece only to find yourself spending weeks trying to solidify and bring the ending up to tempo. By addressing the most challenging passages early, you avoid that frustration.

Daily Reinforcement: The Secret to Polish

One of the most powerful ways to strengthen what you’ve learned is very slow practice. Each day, refresh your memory with the score. Play slowly, without pedal, and use a metronome. Deliberately exaggerate clarity and precision. Slow practice reinforces memory and builds security in your hands.

Even when preparing for a public performance, after the music is at concert level, it can become stale if you don’t continually refresh and reinforce it. The best way to maintain a high polish is slow, deliberate practice without pedal, often referencing the score.

When you can play the piece at or near concert tempo, without pedal, with or without the score, check your work with the metronome and use progressively faster metronome speeds in particularly difficult passages until everything feels easy and controlled. Then you know you’re ready to perform.

Additional Practice Techniques

Beyond slow practice, there are many other techniques you can use. You can practice with different rhythmic groupings. You can accent certain notes to clarify where the hands play together. This is especially valuable for achieving a clean technique, ensuring that both hands strike precisely together where required. You can practice passages in varied rhythms or isolate small note groups. Hands separate practice is always valuable for polishing and refining difficult sections.

There are countless ways to strengthen and refine your playing. But the most important principle is this: learn it correctly from the very beginning.

Putting It All Together

To recap:

First, read through the piece to become acquainted with it, but don’t keep rereading it and reinforcing mistakes. Then start from the beginning and memorize in very small sections. Learn the right hand, then the left hand, then put them together slowly and memorize. Pay attention to notes, rhythm, fingering, phrasing, and expression.

Each day, refresh what you’ve already learned. Use slow practice without the pedal, and use a metronome and the score to reinforce your memory. Think of it like an assembly line. The newest sections are raw material that you’re shaping and forming. The sections you learned days or weeks ago are finished products that you continue to polish and refine. If you learn music carefully and correctly from the start, you will save yourself enormous amounts of time and frustration.

This is Robert Estrin at LivingPianos.com, Your Online Piano Resource. Thanks so much for joining me.

A Day by Day Journey to Mastering a Difficult Piano Piece

Welcome to LivingPianos.com. I’m Robert Estrin. Today I’m going to take you on a day by day journey of mastering a difficult piano piece. Maybe there’s a piece you’ve always wanted to learn, or perhaps you’re struggling with one right n

Welcome to LivingPianos.com. I’m Robert Estrin. If you are considering putting a piano into storage, this is something you absolutely need to think through carefully. I have seen this scenario play out time and time again, and it can end in a way most people never expect.

Climate Control Is Not Optional

People are downsizing, they cannot sell their piano, or they think they may be moving. So what do you do? You find a place to store your piano. If you ever have to do this, make absolutely certain that it is climate controlled storage. I remember having pianos at a storage facility and only later being told that winter was coming and we had better get the pianos out of there. So double check. Make sure the facility is truly climate controlled. This is critical for the health and longevity of your instrument.

The Hidden Costs of Storage

Here is what often happens. You pay month after month to store the piano. Eventually, you have paid so much that you start to wonder what to do next. If you decide to try to sell the piano, good luck. In many storage facilities, pianos are stored on their sides to maximize space. Just to have someone come and look at the piano, you may have to pay hundreds of dollars to have it set up properly. And of course, it will not be tuned because it has been sitting in storage. It can become a nightmare situation for so many people.

What Happens When Payments Stop

Now here is the part that may really shock you. After paying month after month, sometimes for years, people reach a point where they simply stop paying. They do not know what to do with the piano. Often they have already moved, which is why the piano went into storage in the first place. Storage companies will make a good faith effort to contact the owner. But if they cannot reach them, they sell the piano. So after spending hundreds or even thousands of dollars in storage fees, the piano may ultimately be sold by the storage company. I know this for a fact from at least two companies I am intimately familiar with, and this is something that happens on a regular basis.

Think Long Term Before You Store

The lesson for today is simple. Before putting a piano into storage, think long term about your end goal. You do not want to be stuck spending hundreds or thousands of dollars on a piano you may never get out of storage again.

If I can be of any help to you, please reach out to me at Robert@LivingPianos.com. We have many resources available for you here at LivingPianos.com, Your Online Piano Resource.

The Shocking Truth About Piano Storage

Welcome to LivingPianos.com. I’m Robert Estrin. If you are considering putting a piano into storage, this is something you absolutely need to think through carefully. I have seen this scenario play out time and time again, and it can end in a w

Working My Way Up to Something Special

Over the years, I gradually worked my way up through different pianos. At one point I had a Young Chang 6’1″, and from there I upgraded to a Baldwin L. Each instrument was a step forward, both musically and personally.

Then something unexpected happened. My top piano technician, who was a concert technician, owned an older Mason & Hamlin BB. For those of you who may not know, the BB is a 7-foot grand known for its massive construction and rich tone. Mason & Hamlin pianos have a distinctive depth of sound, and this one was particularly special.

What made it extraordinary was not just the design, but the care it had received. It belonged to a master technician. The regulation and voicing were superb. Everything about the instrument felt refined and responsive. When he decided to move away, he asked me to sell the piano for him. The moment I played it, I knew I wanted it myself. So I sold my piano and bought the Mason & Hamlin. I truly believed I had found the ultimate instrument.


An Offer I Did Not Expect

Not long after that, a concert pianist came in looking for a piano for a friend. At the time, I had a Baldwin L for sale. He tried it and liked it. Then he sat down at my Mason & Hamlin. I told him it was not for sale. He understood, but he kept playing it anyway.

A few days later, he returned and played both pianos again. This time, he made me an offer to purchase both instruments. It was not an easy decision. The Mason & Hamlin was supposed to be my piano. But the offer was significant, and I reluctantly agreed.

Almost immediately, I felt what you might call “seller’s remorse.” I realized that if I ever wanted something equal or better, I would have to look for a 9-foot concert grand. So that is exactly what I did.


Searching for the Ultimate Concert Grand

I brought my technician with me as we searched far and wide for the right instrument. At one point, I even purchased a 9-foot Baldwin in San Francisco. We brought it back and worked on it extensively. It was a fine piano, but it was not quite the extraordinary instrument I was hoping to find.

Then we discovered a Baldwin SD-10 concert grand in the San Fernando Valley. This is a 9-foot concert grand and one of the great American pianos. From the first notes, it was clear this was something very special. My technician told me it was one of the two or three finest pianos he had ever encountered, and he had worked on countless concert instruments. I absolutely loved that piano.

A Piano That Inspired Pianists

We used that Baldwin SD-10 for a concert series, and pianists who performed on it consistently praised it. Many told me it was the best piano they had ever played. It had power, warmth, and remarkable control across the entire range of the keyboard. It was everything I had hoped to find.


A Change of Circumstances

At the time, we were in a loft with 19-foot ceilings, and the piano filled the space beautifully. However, when we moved to a smaller location, it became clear that the instrument was simply too powerful for the room. It was more piano than the space could comfortably handle.

After much thought, I decided to put it up for sale. There was strong interest from around the country. Two different concert organizations were seriously considering purchasing it, and we even discussed the possibility of my performing a dedication recital when the piano was installed. It seemed like the perfect way to pass along such a remarkable instrument.

An Unexpected Buyer

Because those organizations needed board approvals, the process took time. Meanwhile, one Sunday afternoon, an elderly couple came in from the desert. They had seen the piano listed online and wanted to see it in person.

The gentleman sat down at the piano and played just one thing. He stood up and said, “I’ll take it.”

The one piece he played on that piano was Chopsticks!

Where It Ended Up

After all the performances, all the praise from accomplished pianists, and all the discussion of concert halls and dedication recitals, the greatest piano I ever owned ended up in a private home in the desert… For Chopsticks. So I have some mixed feelings about the sale of that piano.

So that is what happened to the greatest piano ever made, at least in my experience. If you have your own story about remarkable pianos, share them in the comments here at LivingPianos.com and on YouTube! Thanks again for joining me.

What Happened to the Greatest Piano Ever Made?

Working My Way Up to Something Special Over the years, I gradually worked my way up through different pianos. At one point I had a Young Chang 6’1″, and from there I upgraded to a Baldwin L. Each instrument was a step forward, both musica

Welcome to LivingPianos.com. I’m Robert Estrin. How many of you have played that famous C major sonata of Mozart, or always wanted to play it? If that sounds like you, you’re in the right place. We’re going to take a complete deep dive into how to learn and master this ubiquitous Mozart sonata, starting right from the beginning.

A Section-by-Section Approach

We’re going to start at the very beginning and work through the piece section by section. By the end of this video series, you’ll be able to truly master this wonderful sonata. Have your score ready. There’s a link in the description so you can follow along with the music, and I’ll be here to guide you every step of the way. As we go, I’ll explain sonata allegro form so you can understand the structure, but more importantly, learn how to execute it cleanly and get that sparkle you’ve always wanted in this piece.

Exposition

Sonata form begins with the exposition, where the main themes are introduced. The opening theme is in C major, and from there the music moves into the second subject. It’s helpful to slow down here and focus on just this section so everything is completely clear before moving on.

How to Learn a Piece Like This

How do you actually learn something like this? I always recommend reading through the entire movement a couple of times first, just to get acquainted and understand the overall shape of the music. Then get right down to work in very small sections. You can learn four measures at a time, or even just two. Many people think learning two measures at a time will take forever, but it’s exactly the opposite. The smaller the sections, the longer and more productive your practice sessions will be. You won’t feel overwhelmed, and you can really digest the score. Two measures at a time is more than enough to make solid progress.

Learn the Right Hand First

At the very beginning, take just the right hand. Follow all the markings in the score, including the notes, rhythm, phrasing, expression, and fingering. If you’re using an Urtext edition, you’ll notice it contains only what Mozart wrote, which means there’s no fingering included. In that case, you may want to reference another edition that includes fingering, such as editions available from Virtual Sheet Music or IMSLP.

Learn just the first two measures with the right hand. This won’t take long. Play it several times until it’s memorized, checking back and forth with the score. Once it feels comfortable, bring it up to an easy tempo.

Then Learn the Left Hand

Next, learn the left hand. Because it’s built on broken chords, start by learning the chords as solid blocks. This helps you understand the underlying harmony and naturally leads to good fingering. Memorize those chords first, then break them up and play them as written.

You may find that using the pedal creates a beautiful sound. While Mozart’s piano didn’t have a modern sustain pedal, it did have a knee lever that served a similar function. Still, too much pedal can blur the texture. Instead, you can use what I call a phantom pedal by holding the first note of each chord. It’s not essential, but it produces a lovely effect. This enables you to use the pedal to enhance the melody instead of using it to make the chords smooth.

Once the left hand is secure, make sure the right hand is still correct. Check all the details. For example, notice the slur in the second measure and be sure to shape it properly. You never save time by learning something incorrectly, even if it seems minor.

Put the Hands Together

The hardest part of piano playing is putting the hands together. Once each hand is securely memorized, slow the tempo way down and try playing hands together from memory. And check your work. Make sure, for example, that the C in the right hand releases exactly when the E plays at the quarter rest at the end of the second measure. Be fastidious with the details, because you will spend ten times longer fixing anything you didn’t pay attention to initially. If you’ve ever learned something wrong, you know how hard it is to eradicate it. Don’t be in a rush to get it halfway there or even 95 percent there, because that last 5 percent will take far longer than learning the whole thing correctly the first time. Get it right from the start by breaking it down carefully.

Trills Without Stress

In the fourth measure, there is a trill. Trills must be measured, but they don’t have to be fancy. A simple trill using steady 16th notes is perfectly effective. You can always embellish later if you want, but first learn a clean, basic trill so you can move forward confidently.

This same principle applies throughout the movement. Don’t get stuck trying to execute elaborate ornamentation. Learn the movement first. Mozart gives you artistic license with trills, and simplicity can be just as beautiful.

Scale Passages and Technique

Now, in terms of the scale passages that follow, you can practice them just like scales. I’ve got a detailed scale tutorial video that I highly recommend, which shows how to practice these passages with proper technique using the metronome at a slow tempo. Use a slow tempo and focus on raised, rounded fingers. Articulate not only the attack of each note, but also the release, so everything stays clean and even.

Keep your hand position secure so the thumb has room to move. Avoid playing too far out on the keys or flattening the fingers. Rounded fingers make them effectively the same length, allowing for ease and consistency. Start very slowly if necessary and gradually increase the tempo.

You need to use your wrists for staccatos. If you use your arms instead, it will sound like a wet noodle. This way of articulating is especially important at faster tempos. Although Mozart wrote very few dynamics and phrasing markings, that doesn’t mean the music should be played without expression. Logical phrasing is always required.

Understanding Sonata Form

This movement follows sonata form, which consists of an exposition, a development, and a recapitulation. In the exposition, the first theme appears in C major, followed by a second theme in G major, the dominant. The entire exposition is repeated so the themes become firmly established.

In the development section, the music moves through a variety of keys, all derived from the original material. One of the fascinating aspects of this sonata is that the opening theme appears in F major, the subdominant, during the development. This is unexpected and shows how Mozart often bent the rules of form.

In the recapitulation, the second theme returns in C major and closes much like the exposition, but now everything resolves in the home key.

Repeats and Final Thoughts

It’s important to take the first repeat of the exposition, as this helps the themes become fully absorbed by both the player and the listener. In the recapitulation, the ornamentation can be exactly the same as in the exposition. There is no need to add extra notes or play elaborate trills; a simple execution is entirely appropriate and still captures the musical character.

That covers the first movement of this Mozart sonata. With careful practice and attention to detail, it becomes not only manageable, but deeply rewarding to play. In the next part of the series, we move on to the second movement, which is a true gem and a beautiful study in lyrical playing and tonal control. Thanks for joining me here at LivingPianos.com, Your Online Piano Resource.

How to Learn Mozart’s Famous C Major Sonata: A Step-by-Step Guide

Welcome to LivingPianos.com. I’m Robert Estrin. How many of you have played that famous C major sonata of Mozart, or always wanted to play it? If that sounds like you, you’re in the right place. We’re going to take a complete deep dive into