Piano and Music Videos

Can't find what you're looking for?

Welcome to LivingPianos.com, I’m Robert Estrin. Today I’m going to address a question from a viewer. The viewer asks, “Can you comment on finger staccato and how this interacts with the wrists and staying closer to the keys as speed increases? I’m referring to the technique of flexing the fingers toward a more closed fist with each staccato note. The action requires suddenly scratching the keys or sliding the finger pads on the key tops. This is described as feeling like pulling the notes from the keys. I found this very valuable, but I seek more wisdom on integrating this with other techniques of speed and lightness.” This is a very interesting question. I get a lot of people asking about this idea of rubbing the keys. Indeed, there is something referred to as finger staccato.

What is finger staccato?

I’ve talked a great deal about staccato and how it’s performed from the wrist. Indeed most of the time staccato is performed from the wrist. The wrists are fundamental in playing staccatos on the piano. But sometimes there is an articulation that you want to achieve to get space between the notes, something that’s too fast for the wrists to accomplish. For example, in the Gigue, the last movement of Bach’s French Suite in G major, his fifth French Suite, you can play legato, but playing with a finger staccato creates a harpsichord like tonality to the punctuation of each note. It almost sounds faster, even playing at the same tempo, because of the delineation of each note.

Is this being done by sliding on the keys?

I don’t recommend sliding on the keys for a variety of reasons. First of all, key tops on different pianos are dramatically different from one another. On most pianos today you have composite plastic key tops. Some pianos have ivory. Ivory is a porous material that has more friction than plastic key tops. Also consider the dryness or the moisture on your fingertips. Dry fingers can really slide like crazy on ivory key tops. Sweaty fingers can slide a lot on plastic key tops. But the point is that you have different levels of friction on different key tops. So trying to rely upon rubbing the keys isn’t a reliable technique.

How do you achieve finger staccato?

You achieve finger staccato by staying very close to the keys and getting used to playing with spaces between the notes. You can practice this in your scales. Try practicing at a slower tempo, doing progressive metronome speeds, and keeping it very light. Avoid using the wrists! The wrists can’t go fast enough.

Practicing with staccato fingers is a phenomenal way of training your hand to play fast passagework because each note is articulated.

One of the tricks to getting clean finger work, whether it’s scales, arpeggios, or other types of passagework, is focusing on the release of notes. You want to have note lengths that are uniform throughout. The only way to achieve that is by playing with spaces between the notes. Playing all the notes very short from the fingers makes the maximum space between notes. Which later you can control, so you can have different lengths of spaces between notes. We think of practicing scales as a one-size-fits-all, but why not practice them detached or semi-detached? Ultimately, what makes music sound even is not just the attack of the notes, but the release of the notes as well. You want to have even durations of notes and even spaces between the notes, which can only be achieved by the fingers. By practicing with staccato fingers, it’s an extreme difference from legato playing. Then you can try to fill in all the touches between notes from staccato fingers to legato, so you can get any kind of phrasing you’re after in your playing!

That was a very interesting question! Maybe I didn’t give the answer you expected. I hope this is interesting for you and valuable for your piano playing, as well as your practice. Practicing a piece that has a lot of finger work with all staccato fingers is a heck of a workout for you! And it’s a great way to strengthen your piano playing. I’m Robert Estrin here at LivingPianos.com, Your Online Piano Resource.

For premium videos and exclusive content, you can join my Living Pianos Patreon channel! www.Patreon.com/RobertEstrin

www.LivingPianos.com
www.Facebook.com/LivingPianos
949-244-3729

Finger Staccato Technique on the Piano

Welcome to LivingPianos.com, I’m Robert Estrin. Today I’m going to address a question from a viewer. The viewer asks, “Can you comment on finger staccato and how this interacts with the wrists and staying closer to the keys as speed

Welcome to LivingPianos.com, I’m Robert Estrin. The subject today is about how to play with a metronome. It can be a really daunting task, particularly if you’re not accustomed to playing with a metronome. The tips I’m going to give you today are not just for those of you who are new to the metronome, but also for those of you who practice with a metronome incessantly and wonder how to stay with the metronome.

How do you set a metronome?

There is some great software out there that can be helpful. You can get apps on your phone that allow you to just tap the tempo and it finds it for you, which can be incredibly valuable. But how do you even establish the tempo? Let’s say you’re playing a piece and you’re wondering how to set the metronome. Well, you can tap your foot along with the music to establish the beat. You have to establish the beat first. Then turn your metronome on and try to match it. Once it sounds right, try playing along to see if it feels right. If it feels too fast or slow, adjust the speed and try again until it feels right.

How do you stay with the metronome?

I’ve seen so many people struggle to stay with the metronome. I’m going to show you a very simple technique that’s going to make a world of difference. When the metronome speeds up, speed up with it. When the metronome slows down, slow down with it. Of course the metronome is consistent, but I bet when you’re playing with the metronome, you could swear that it’s speeding up and slowing down! In reality, it’s you who is changing speed. But it feels like the metronome is slowing down or speeding up sometimes, doesn’t it? All you have to do is follow whatever it seems to be doing. If it seems to be getting faster, you get faster. If it seems to be getting slower, you get slower. And if you do that, you will stay with the metronome.

If you continue to struggle you may want to adjust the speed.

When you’re playing with a metronome and you’re not absolutely precisely with it, make minute adjustments in your playing by going a little faster with it, or a little slower with it to get back on time. But if you ever gain or lose a beat, you should stop and figure out if maybe the metronome is set a little too fast for you. Try a slightly slower speed to see if you can stay with it, because you should never gain or lose a beat. However, if you just nuance slightly behind or ahead, you might just finish the phrase then go back and see if you can do it more faithfully on the beat. Practice a number of times until that ebb and flow around the beat is minimized. The goal, of course, is to stay spot on with the metronome. But you don’t necessarily have to stop every single time you’re slightly off. Instead, get used to adjusting. Follow whatever the metronome seems to be doing. That’s the answer for staying with the metronome!

Once again to recap, establish the speed by tapping your foot or tapping your hand and then finding that speed on your metronome. Or better yet, download an app where you can just tap in the tempo. From there you can adjust further to find exactly the right speed. As you’re playing, if it feels just too fast or slow to be able to play with, adjust the speed. But once you lock it in, whatever the metronome seems to do, that’s what you’re going to do. That’s how you’ll stay with the metronome. I encourage all of you to try this! If you’ve had problems with the metronome, try these techniques and see how they work for you. I’m Robert Estrin here at LivingPianos.com, Your Online Piano Resource.

For premium videos and exclusive content, you can join my Living Pianos Patreon channel! www.Patreon.com/RobertEstrin

www.LivingPianos.com
www.Facebook.com/LivingPianos
949-244-3729

How to Play with the Metronome

Welcome to LivingPianos.com, I’m Robert Estrin. The subject today is about how to play with a metronome. It can be a really daunting task, particularly if you’re not accustomed to playing with a metronome. The tips I’m going to give

Welcome to LivingPianos.com, I’m Robert Estrin. The subject today is about how to know when a piece is in a major key or a minor key. There are certain sonic signatures you may already be aware of. Something in the minor key has more of a sad or dark quality than a major key. Just establishing a major key compared to the same exact chord progression in the minor key sounds drastically different. So you might be able to figure out that a piece is in a minor key because of the sadder quality that minor harmonies naturally tend to have. But is there a technical way to differentiate?

The key signature provides you with essential information.

If you know your key signatures, you know that if you have no sharps or flats that you’re probably in C major, if you’re in a major key. Because no sharps or flats form the C major scale. So what if that was in a minor key? What would that mean? Well, here’s the interesting thing about key signatures. All key signatures share both major and minor key possibilities. So if you have no sharps or flats, it could be in C major, but it might be in the relative minor of C major. What do I mean by the relative minor? It has to do with starting on a different note of the scale. The sixth note of the major scale is where the relative minor is found. So if you have no sharps or flats, instead of being centered on C, being centered on A, the sixth note of the C major scale, you are in A minor. Another way you can find the relative minor is to simply go down three half-steps from the major key. So once again, no sharps or flats could be C major, or it could potentially be three half-steps lower than C, which again brings you to A.

So what is the A minor scale?

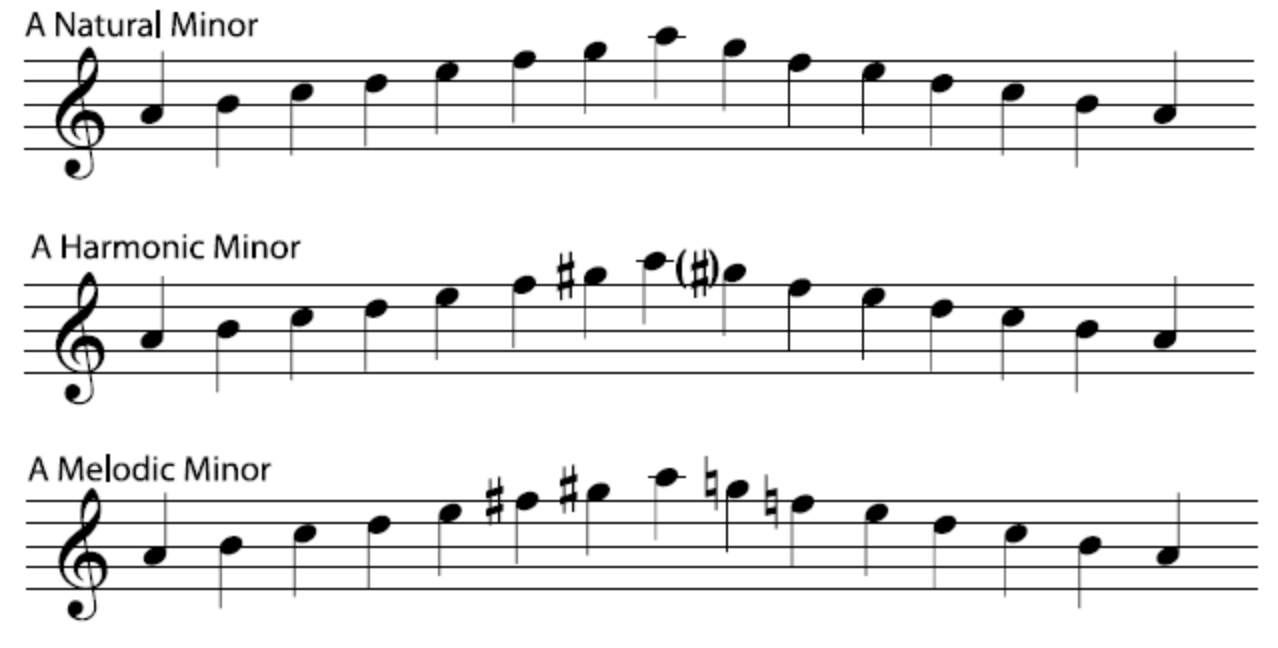
The pure form of the A minor scale is simply the same exact notes of a C major scale, except starting on A. To discover whether a piece is in a major or minor key, you might think all you need to do is figure out where the notes are centered. There is actually a much easier way! Generally speaking, the minor is not found in its pure or natural form. Instead, it’s found in the harmonic or melodic forms, which have altered tones. That is to say that in a harmonic minor scale, the seventh note is raised a half-step. Interestingly, having a raised seventh makes an augmented second between the sixth and seventh notes. All the other notes of the scale are either half-steps or whole steps, but here you have a step and a half between the sixth and seventh notes.

Majors and Minors Sheet music

Why is this so significant? Because if you see a piece with no sharps or flats, and all over the place you have G sharps, then you can pretty well assume that you’re in A minor. I mentioned that there’s a harmonic and a melodic form. The melodic form has two altered tones. Both the sixth and seventh notes are raised by a half-step. But the melodic minor scale descends in the natural form with no altered tones. There’s something really interesting about the melodic minor in that it has all the exact same notes of the major scale with the exception of the third. If you just change the third note from C to C sharp, now you have an A major scale. That’s an interesting side note, not to confuse the issue, because the A major scale has almost nothing to do with the A minor scale, except they are parallel major and minor.

Today the thing to think about is the relative minor.

Once again, the relative minor is found starting on the sixth note of the major scale. In C major the relative minor is A minor, which can be found in either the harmonic form with the raised seventh or the melodic form with the raised sixth and seventh, which only is ascending. Descending, it reverts back to the natural minor. So if you have a piece with no sharps or flats and you see a lot of F sharps and G sharps, you can be pretty well assured it’s not in C major, but it’s in A minor.

With other keys, as long as you know key signatures, you know which specific notes to look for. For example, if you have one sharp in the key signature, which would be an F sharp, this is the key of G major. To find the relative minor of G major, it’s exactly the same thing. It starts on the sixth note of the G major scale. Or you could go down three half steps from G. Either way, E minor is the relative minor of G major. So if you played all the notes of the G major scale, except starting on E, you would have the natural or pure E minor scale, the relative minor of G major. But that’s not the way minor scales generally occur. Usually, minor keys are found in the harmonic or melodic forms with altered tones. Both the harmonic and melodic minor have raised sevenths. The melodic also has a raised sixth. But the raised seventh is the keynote, because either of those altered forms will have a raised seventh. So the seventh note of the E minor scale gets raised by a half-step, which means the D goes up to D sharp. So if you have a piece with one sharp you might assume it could be in G major, which it very well might be. But you also want to investigate the possibility that it’s in the relative minor. Just count up to the sixth note of that scale to E, go to the seventh note of the E minor scale, which is D, and if you see a bunch of D sharps in your score, even though you’re in one sharp and you think you should be in G major, it could very well be in E minor. This is the way to really assess whether a piece is indeed in a minor key or a major key. Every single key signature has its associated relative minor starting on the sixth note of that major key, or going down three half-steps from the tonic note.

I hope this is helpful for you!

Study the scores of pieces you’ve played for years or pieces you’re working on. Check to see those keynotes. If you have a raised seventh in the relative minor, you’re probably in the minor key, not the major key. I hope this has taken a rather complex subject and broken it down for you so that you can investigate for yourself. It is extremely important to have the whole understanding of the score, the harmonies, and the structure. It can help with memory. It can help with sight reading. It’s not just an arbitrary exercise in theory. It has practical elements for you! I’m Robert Estrin here at LivingPianos.com, Your Online Piano Resource.

For premium videos and exclusive content, you can join my Living Pianos Patreon channel! www.Patreon.com/RobertEstrin

www.LivingPianos.com
www.Facebook.com/LivingPianos
949-244-3729


How to Tell if a Piece is in a Major or Minor Key

Welcome to LivingPianos.com, I’m Robert Estrin. The subject today is about how to know when a piece is in a major key or a minor key. There are certain sonic signatures you may already be aware of. Something in the minor key has more of a sad o

Welcome to LivingPianos.com, I’m Robert Estrin. Today’s subject is about how much you should practice the piano. I hear this question all the time. Of course, parents always want to know that for their kids, and adults also want to know if they are practicing enough. This is a great question, but it really isn’t the right question, believe it or not. The most important aspect is not how much you are practicing, but how often you practice. Why is this so important?

Practicing on a daily basis is essential to maximize your productivity and progress at the piano.

When you practice every day, you reinforce what you’ve done the day before on a daily basis. Skipping days is like taking one step forward and two steps backwards. It’s very difficult and can become frustrating. It makes you not even want to practice because you forget what you did and you feel like you’re not getting anywhere. And maybe that’s true. So it becomes self-defeating. Practice every day and you’ll see your progress growing.

Your mind has only a certain amount of time when it can work with maximum effectiveness.

When your mind is fresh, it can be so productive! You can get so much done. So you want to take advantage of that every day. You can even practice more than once in the course of a day. Maybe you have a little bit of time before you start working when you can review what you did the day before. By keeping it present in your head, right from the moment you sit down to practice, you’re ready to go! So that is the most important thing.

Setting the clock to practice a certain amount of time every day isn’t necessarily productive.

Why? Because what is practicing? Sure, there’s a certain amount of physiology involved. You want to develop strength and independence of your fingers and wrists for technique. But that’s not the most important aspect of piano practice. Practicing is a thought process. You can’t just do it by the clock. I’ve seen kids do this when their parents make them practice and they just sit there thinking about anything other than the piano! They’re thinking about what they’re going to do later when they run out the clock. So you must maximize the productivity of your practice. And that takes a thought process that you can’t always force. If you practice for 30 minutes and you’re really focused, you can accomplish far more than practicing for hours while daydreaming or just going through the motions. You want to digest a chunk at a time and really have something to show for your work at the end of practicing. So make sure you get to the piano every day. At least refresh what you did the day before and try to learn something new. Even if it’s just one tiny phrase. And on good days when you’re fresh and you’ve got time, do as much as you can! That way you will really grow tremendously rather than trying to have an arbitrary time limit that you are going to practice.

I hope this is helpful for you and for your teachers. This is a great recommendation, particularly for parents of students, because a lot of parents don’t know how hard it is to practice if you’re doing it correctly. So give your kids a break! Just make sure they do some work at the piano every day. That’s the most important thing. Thanks again for joining me! I’m Robert Estrin here at LivingPianos.com, Your Online Piano Resource.

For premium videos and exclusive content, you can join my Living Pianos Patreon channel! www.Patreon.com/RobertEstrin

www.LivingPianos.com
www.Facebook.com/LivingPianos
949-244-3729

How Much Should You Practice The Piano?

Welcome to LivingPianos.com, I’m Robert Estrin. Today’s subject is about how much you should practice the piano. I hear this question all the time. Of course, parents always want to know that for their kids, and adults also want to know i

Welcome to LivingPianos.com, I’m Robert Estrin. Today’s subject is about how music creates emotion. There are many scientific studies about this. It’s remarkable that you can listen to a tune, a theme, a composition, a symphony, or a song, and it can make you feel something inside! How is this possible? There’s a lot to it. But today I want to talk about two fundamental principles of music that I believe are the primary mechanisms by which we feel emotion in music: repetition and development.

Repetition is such a strong aspect of being able to feel emotion in music.

Repetition helps you to comprehend what’s going on. There’s something very refreshing about returning to a familiar theme, particularly when you transition from something chaotic. That’s why a sonata-allegro form which has repeated sections of themes that develop, then return later, is a magical formula. It feels right. The same sort of formula is used in popular songs. The verse and chorus alternate back and forth. Then the bridge takes you astray. So when the verse or chorus returns, it feels so satisfying!

Development is also vital.

Developing upon a familiar theme can bring out many different emotions. For example, the beautiful theme in the Chopin G Minor Ballade. – how it is first stated, and how it comes back completely differently again and again. And because it’s a familiar theme, it has so much power. In the first repeat of the theme, it has little embellishment. But later in the Ballade, you hear the same theme in a grandiose version. It transcends into a gloriously dramatic theme. But if you hadn’t earlier heard the same theme in that delicate, poetic setting, it wouldn’t have such an impact. That’s just one example. There are limitless examples of repetition and development in music, which are the keys for being able to create emotion in music. There’s much more to it than that, but these are two elements that are intrinsic to virtually all music!

I hope you’ve enjoyed this. Thanks again for joining me! I’m Robert Estrin here at LivingPianos.com, Your Online Piano Resource.

For premium videos and exclusive content, you can join my Living Pianos Patreon channel! www.Patreon.com/RobertEstrin

www.LivingPianos.com
www.Facebook.com/LivingPianos
949-244-3729
How Music Creates Emotion

Welcome to LivingPianos.com, I’m Robert Estrin. Today’s subject is about how music creates emotion. There are many scientific studies about this. It’s remarkable that you can listen to a tune, a theme, a composition, a symphony, or

Welcome to LivingPianos.com, I’m Robert Estrin. Today’s subject is about why you must be able to play your scales on auto-pilot. What does this mean? I’ve talked before about motor memory or tactile memory being a dangerous thing to rely upon in your piano playing. You can take a wrong turn here or there if your mind isn’t cognizant of where you are in a composition. With repeats, expositions, developments, changes of keys, you must have an intellectual awareness of your music. Otherwise, you can end up in the wrong place in the middle of a piece! But, you absolutely must be able to play your scales with just motor memory because of the fingering crossings.

All major and minor scales involve finger crossings.

Scales encompass thumb crossings in the right hand going up and in the left hand coming down. And you have third and fourth finger crossings in the left hand going up and in the right hand coming down. All major scales and minor scales have the same basic premise of third and fourth finger crossings in one hand going up, the other hand coming down, and thumb crossings in one hand going up and the other hand coming down. That’s a whole lot of stuff to remember! That’s why in the early years of study, rather than working on scales which have complicated fingering to learn, it’s better to develop the strength of your fingers first by playing early Hanon exercises which avoid finger crossings.. The whole idea of practicing scales is to develop fluid notes in a row so that you can play beautiful streams of notes with evenness and clarity.

What if you can’t get the fingering?

As I mentioned, I love to start students with the very first exercises in Hanon, which have myriad different patterns, but none of them involve finger crossings. So, you get to work out your fingers developing strength, fluidity, and speed, without worrying about the complexity of finger crossings. But why do they have to be on automatic pilot? When you’re playing a fast scale, there just isn’t time to think of all of those fingerings! You have to be able to just do it without thinking about the actual fingering. Then you can focus on the sound, the expression, the volume, the evenness, and the clarity without thinking about fingering.

I made a video a few weeks ago on how playing the piano is like learning how to walk. At the beginning, it’s a struggle. If you’ve ever watched a toddler taking their first steps, the concentration on their faces is unbelievable as they figure out how to traverse one step to the next. We don’t have to think about walking, because we walk on auto-pilot. Imagine if every time you took a step you had to think about everything involved, the coordination, the foot muscles, the leg muscles, and keeping your body upright. It would be almost impossible to do anything while walking! Yet, we walk and talk about all sorts of things all the time and don’t even think about it. That’s exactly what you must do with your scales. How do you get to that point? Well, first of all, you should only start scales when you have enough strength in your fingers. If you’re just starting out learning scales an octave or two octaves, it’s really not that valuable.

You want to play all your scales in four octaves right from the get-go.

Even though the fingering is the same, when you’re playing in the low register, the angle of your arms is quite different from playing in the high register. You must get used to playing the whole keyboard. If you’re not up for that challenge yet, you’re better off doing 5 or10 Hanon exercises first to prepare yourself for practicing scales. This is a great way to get your fingers strong and to develop fluidity. Start with one note to the beat at 60 to the metronome, so you can really see how your fingers are working, then two notes to the beat, and then finally, four notes to the beat. Work on these Hanon exercises until you can play them in a fluid manner with strength and evenness. Then you are ready to embark upon scales. You should work on your scales in exactly the same way. Work on them in four octaves, just like in Hanon: 60 Selected Studies For The Virtuoso Pianist. This book is like the Bible of scales and arpeggios because it has all the standard fingering that 99% of pianists utilize. I highly recommend getting a copy. Get to the point where you can play your scales without thinking about fingering. Then when you have scale passages in music, you don’t have to start practicing like it’s a fresh thing. It’s already there, literally at your fingertips!

That’s the lesson for today. Get your scales on automatic pilot, on motor memory, on tactile feel, so you don’t have to think about the fingering. If any of you touch type as I do, you know that you don’t even have to think about where your fingers are going. Those of you who have to hunt and peck, you know it’s a little slower, a little bit harder, but you can get pretty fluid at it. But when you know where the keys are without even thinking about it, it makes it so much easier. You want your scales to be that easy as well!

Thanks again for joining me! I’m Robert Estrin here at LivingPianos.com, Your Online Piano Resource.

www.LivingPianos.com
www.Facebook.com/LivingPianos
949-244-3729

Why You Must be Able to Play Your Scales on Auto-Pilot

Welcome to LivingPianos.com, I’m Robert Estrin. Today’s subject is about why you must be able to play your scales on auto-pilot. What does this mean? I’ve talked before about motor memory or tactile memory being a dangerous thing to