Around the 1880s it became much more common for pianos to feature cross stringing – which is what you will see in pretty much any piano designed and built in the modern era. Also referred to as being “overstrung” this design of crossing strings over one-another allows them to be longer and fit into a smaller frame.
Before the advent of cross stringing, pianos would have to be larger in size to produce a vibrant tone. The strings of a modern baby grand piano are generally longer since the crossing allows for longer string length for much of the piano. This is one reason why small baby grands were impossible to design before the advent of cross-stringing.
Other than the placement of the strings, the location of the bridges on the soundboard also differs dramatically between a straight strung and a cross strung piano. Modern pianos with cross-stringing allow for placement of the bridges closer to the center of the piano for more of the notes. You may wonder how the sound of earlier straight strung pianos differs from modern design instruments.
Playing one of these straight strung pianos is truly an experience. As you play you’ll hear the same type of tone production that Chopin and Liszt experienced in their day for the most part – it really transforms you back in time to a different era. It’s an exhilarating experience to hear and play their music as they heard it – a punchier, more percussive sound.
Thanks again for joining us here at Living Pianos. If you have any comments, suggestions or questions about this topic or any others please contact us directly: (949) 244-3729 or email us: Info@LivingPianos.com
This is an interesting topic that many of you might not be familiar with. Recently we had an amazing instrument come into the store – an 1875 Erard Concert Grand Piano. What made this piano so unique is that it’s one of the very few instrumen
While this might sound silly, learning to play music mentally is one of the best practice methods. All practice is mental practice. While the action of playing an instrument has a physiological component, learning and practicing is much more of a men
I am actually someone who is very much in favor of short cuts wherever they can work. I’ve talked about methods in the past such as The Band-Aid Approach to practicing music that is a method in which you focus on the trouble spots of your performance in order to save time. This is not to say that this method isn’t a form of thorough practice; it’s just incredibly efficient focusing 80% of your time on 20% of the music which needs most of the work. I once had a student whose former teacher told them to play an entire piece through at a slow speed with the metronome and then speed it up one notch at a time playing through the entire piece again and again. This is definitely thorough practice but it wastes your time since only sections of the piece may require this kind of approach.
So what do I mean by thorough practice? Sometimes you’ll be learning a new piece and it’s not up to the level you want. You might find yourself jumping into random spots and trying to fix problems – this can be a mistake. Instead of moving on, go to the first spot you have difficulties with and stay focused on it. Stay with this section and keep working on it until you have it absolutely dialed in, perfect and reliable. If you stay with a section until you have it mastered as described above, you will find yourself playing it correctly even after time has elapsed. Even more importantly, the techniques you learn in that section will help you throughout the rest of the piece. There is rarely a piece of music you will encounter that doesn’t contain a repetition of ideas, techniques, harmonies and textures. So, the thorough work you do on one section will translate to other parts of the piece.
As you move through the piece perfecting trouble spots, you will find that your practice becomes incredibly productive. As opposed to just going through the piece and working on random trouble spots, find the origin of your problems, start there and practice it so completely that you can play it accurately with ease.
To recap, work on the difficulties you encounter early in a piece of music and you will be rewarded later in your practice. Thorough practice is what will make you a more accomplished musician. It is so gratifying to perfect a small part of a piece and continue on that path than to plow your way through without refining your work.
Thanks again for joining us here at Living Pianos. If you have any questions or comments about this video or any other subject please contact us directly: Info@LivingPianos.com (949) 244-3729
Today we are going to talk about why it’s crucially important to practice your music thoroughly as opposed to just quickly. You might think if you can practice something quickly it would be a big benefit to you but that’s not always the case. I a
You might wonder whether or not it’s a frivolous expense to spend $60,000, $80,000 or more on a piano when you can buy a decent Asian production piano for a fraction of the cost. Are expensive pianos worth the price or are they merely status symbol
If you followed my past lessons on Burgmüller you might notice how different each of these pieces sound. It’s a great way to introduce students to many different types of music that are both easily accessible and unique from one another.
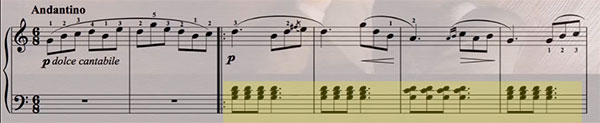
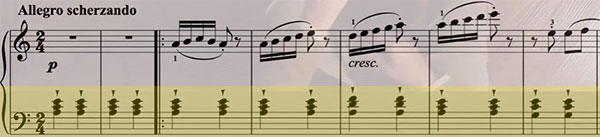
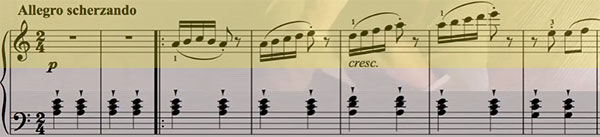
The key to mastering this particular piece is a lot like the first lesson we covered which is to use the weight of your arms to maintain a smooth legato with rises and falls of dynamics in each phrase. This piece has the added challenge of a degree of complexity in the left hand. As opposed to the whole notes in La Candeur, you have a pattern of repeated chords:
I always recommend practicing your music without the pedal first in order to achieve a smooth legato. The same principle remains true here. Once you feel confident, you should add the pedal to add to the smoothness.
After you’ve practiced both hands independently try putting them together but still practicing without the pedal. You want to achieve a smooth legato in both hands without using the pedal as a crutch. Once you can play smoothly with confidence, go back and add the pedal.
Why is it so important to play notes legato if you’re going to add the pedal anyway?
This is a likely question you hear from intelligent students. Wouldn’t the pedal make everything smooth anyway? Not necessarily. You must capture all the notes of the first chord in each group whenever engaging the pedal. If you miss any of the notes on the pedal, you will lose the legato. By playing the chords long, you will ensure that all the notes are down when you press the pedal.
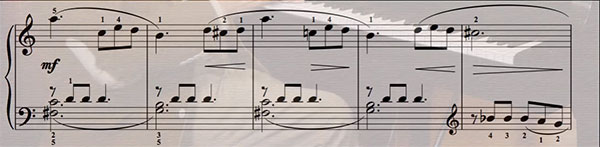
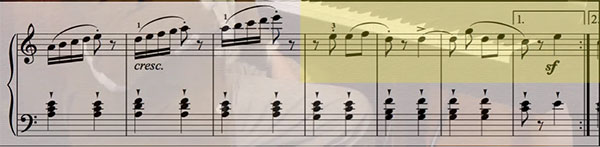
In the next section you will not need to use the pedal but you will face a different set of challenges. You have repeated notes in the left hand and a different rhythm to deal with in the right hand:
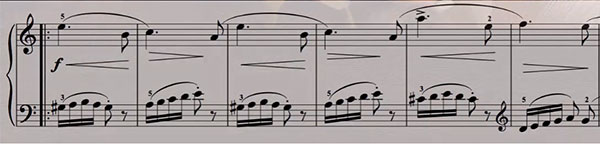
Make sure you play these notes legato. Not just in the right hand but the left hand as well. Repeated notes present a unique challenge. How can you play these notes legato? The secret is changing the fingers you use for each note. This way you can have one finger coming going up while another finger is going down. This technique will create a sense of connectivity in the notes and create a beautiful line. Try this section with this technique and see if you can tell the difference:
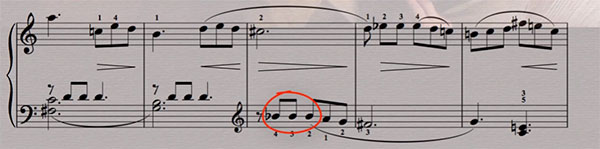
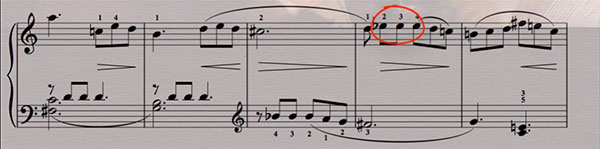
Notice 4-3-2 on these B flats. You’ll notice the right hand has the same technique:
Notice the 2-3-4 listed on those notes.
You’ll see these numbers over repeated notes quite a bit in this piece. The secret is to change fingers for repeated notes so you can achieve a smooth sound.
Thanks again for joining me Robert Estrin here at Living Pianos. I hope this has been helpful for you and make sure to stay tuned to our future episodes in the Burgmüller studies on piano. If you have any questions about this topic or any topic at all please contact us directly: Info@LivingPianos.com (949) 244-3729.
Welcome back to our multi-part series on the Burgmüller Studies. These pieces are really great for piano students at a fairly elementary level yet provide some gorgeous music. In the first lesson we covered La Candeur (Frankness) and last time we co
Where La Candeur provided beautiful lyricism, L’Arabesque provides excitement. This is a great piece to study because it presents quite a few technical challenges. It also provides a great opportunity to explore phrasing – staccatos and slurs as well as accents. If you were to play this piece without those elements of phrasing it would be incredibly lifeless and dull.
How do you get this piece to sing and more specifically, how do you get it to be snappy and fun? It all comes down to the wrist. I encourage you to watch my original lesson on how to utilize your wrists but to describe it quickly here: The wrists must be identified separately from the arms. The arms are big and heavy and can’t give you the same quick motion the wrists can.
Take your hand and place it over the first chord in the piece. Place your fingers on the keys but don’t push down. Then slowly raise your wrist so your fingers are a little less than an inch above the keys, drop them and play the notes and then snap your wrist back into place over the keys. Keep practicing this and make sure that you aren’t using your arm at all – all the motion in your playing should come from the wrist. The arms are great for strength but they will not give you the speed you will need to play this piece; the motion must come from the wrist.
In this first section you should practice these chords with the wrist until you feel absolutely comfortable playing them.
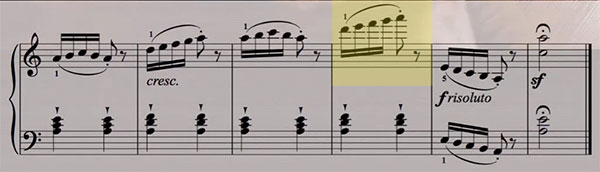
The right hand in this piece also contains phrasing and it’s very important that you don’t overlook it. As we can seen in the picture below, there are notes with slurs connecting them and they end in a final note that is played staccato. It might not always be written as staccato but they should be played as such because it’s at the end of a slur. Why is this? Staccato means “not connected” and the end of a slur is not connected. In this piece, which has a brisk tempo, you will want to play the end of your slurs as staccato.
The best way to play these note groups is by playing the slurs and then ending by having your hand come up for the last note. It creates a nice sound and helps to play that last note staccato. Practice these groups of notes in your right hand – make sure you come up for the last note in each group until you are comfortable playing them.
Now try practicing with the hands together.
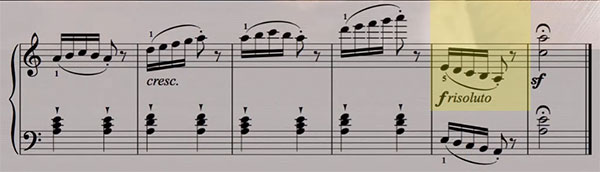
In the next section the left hand will continue with staccato chords but the right hand has eighth notes and it’s extremely important that you phrase these correctly. You’ll need to pay attention to the staccatos and legatos so that you can bring life to this music.
You can do the same type of motion with your wrists for the staccatos in this section. Release the wrist upward on them to get a nice snappy sound. On the accents, let your wrist come down for emphasis. When you put this together with the left hand it you will achieve excellent clarity of voices – the contrast of staccato and legato elements.
In the next section the hands reverse techniques. The right hand becomes legato and the left hand has staccato with the down up motion with the wrist.
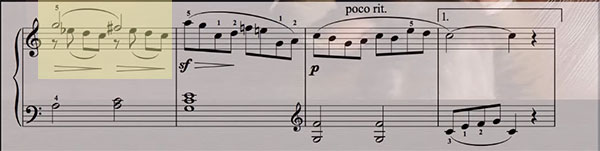
Now we will flash forward to the end of the piece where you must move your hands instantly in order to play the last chord. This can be a real challenge for students but it’s a great learning experience which I have a method that will help in any situation like this.
You’ll need to get from here:
The here:
That’s not going to be easy! However, there is a relatively simple way to overcome this problem. You’ll need to find out the perfect hand position for that last series of notes. Go ahead and place your hands there and remember that position. Now, play the series of notes before it and right when you end, place your hands and arms over the last chord instantly. Don’t play any of the notes yet – just get your hands over the chord. Keep doing this until you consistently get in the right position. When you feel confident go ahead and play the last chord. Keep doing this until you can play it over and over again without any issues. This is an extremely helpful technique for all your music that requires large leaps. Here is an article and video on this subject:
I hope this lesson has been helpful for you. If you have any comments, questions or suggestions for future videos please contact us directly: info@LivingPianos.com (949) 244-3729
Welcome back to our multi-part series on the Burgmuller Studies. These pieces are really great for piano students at a fairly elementary level yet provide some gorgeous music. Last time we covered La Candeur (Frankness) and this time we are going to
A musical repertoire is one of the most important things a musician has. A repertoire is a demonstration of your accomplishments and provides the foundation for you as a musician, so it’s important to have music that you can play at any time which
The secret to getting a sustained and beautiful tone is to have the weight of your arms supported by the fingers. You’ll want to transfer the weight from finger to finger to create a long and beautiful legato. You don’t want to apply pressure just at the start of a note but during the entire phrase. If you were to play on someone else’s arm they would feel a constant pressure from the weight of your fingers and arms pressing down, not just at the start of the notes.
If you were to calculate the volume of each note louder and louder to the top of the phrase, then quieter and quieter, you would end up with calculated playing, not a smooth line. Using the weight of your arm – almost as if it were the breath in music – to get louder during the middle of a phrase and softer towards the end of a phrase, you will create a very dramatic and pleasing tone throughout. You want the piano to mimic a wind instrument or a singing voice in it’s tone.
In another part of the piece you have a section which almost sounds like it could be written for two different instruments in the right hand:
On the top you have these half notes:
And on the bottom you have a completely different voice:
It’s important to leave the top (half notes) down while you play the other notes. How can you achieve this? By practicing the long notes legato and the short notes staccato from the fingers. This creates independence of the fingers to assure delineation of the two lines. Without doing this you might end up holding down all the notes or not holding the half notes for their full value – which would be incorrect.
Thanks again for joining me, I look forward to our next lesson on Burgmuller. If you have any comments or questions for this topic or any topic at all please contact me directly: info@LivingPianos.com (949) 244-3729
Welcome to the first in our series on The Burgmüller Studies. Burgmüller was a wonderful composer who wrote pieces that are accessible to less advanced students, yet offer absolutely wonderful musical content. I always encourage students who have p
One of the most important parts of developing as a musician is being able to read music and being able to read it quickly. Memorizing the notes on the staff is an integral part of progressing musically and I’m going to share a few tips that will ma