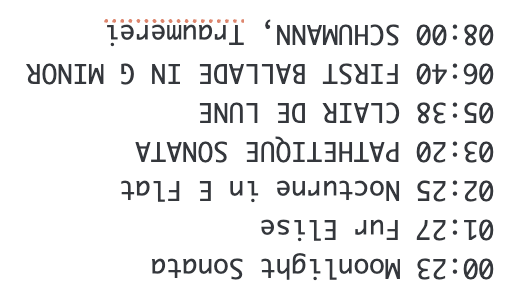
Welcome to LivingPianos.com. I’m Robert Estrin. Today I have something a little different and a lot of fun for you. In this video, I put your ears to the test with a musical guessing game. I play short excerpts from some of the most famous classical piano works ever written, and your challenge is to identify each piece as quickly as possible. Some may be instantly recognizable from just a handful of notes, while others might take a few more seconds before everything clicks into place.
This is more than just a trivia game. It is a wonderful way to sharpen your listening skills and discover how deeply these great works are etched into your musical memory. You might surprise yourself by recognizing a piece from its harmony, rhythm, or even just its texture before the main theme appears. See how many you can name within ten seconds, keep score if you like, and share your results in the comments. I would love to hear which ones you knew right away and which ones kept you guessing.
Let us know how you did on this listening test!
Leave comments about pieces you would like full tutorials on.
Welcome to LivingPianos.com. I’m Robert Estrin. If you are considering putting a piano into storage, this is something you absolutely need to think through carefully. I have seen this scenario play out time and time again, and it can end in a way most people never expect.
Climate Control Is Not Optional
People are downsizing, they cannot sell their piano, or they think they may be moving. So what do you do? You find a place to store your piano. If you ever have to do this, make absolutely certain that it is climate controlled storage. I remember having pianos at a storage facility and only later being told that winter was coming and we had better get the pianos out of there. So double check. Make sure the facility is truly climate controlled. This is critical for the health and longevity of your instrument.
The Hidden Costs of Storage
Here is what often happens. You pay month after month to store the piano. Eventually, you have paid so much that you start to wonder what to do next. If you decide to try to sell the piano, good luck. In many storage facilities, pianos are stored on their sides to maximize space. Just to have someone come and look at the piano, you may have to pay hundreds of dollars to have it set up properly. And of course, it will not be tuned because it has been sitting in storage. It can become a nightmare situation for so many people.
What Happens When Payments Stop
Now here is the part that may really shock you. After paying month after month, sometimes for years, people reach a point where they simply stop paying. They do not know what to do with the piano. Often they have already moved, which is why the piano went into storage in the first place. Storage companies will make a good faith effort to contact the owner. But if they cannot reach them, they sell the piano. So after spending hundreds or even thousands of dollars in storage fees, the piano may ultimately be sold by the storage company. I know this for a fact from at least two companies I am intimately familiar with, and this is something that happens on a regular basis.
Think Long Term Before You Store
The lesson for today is simple. Before putting a piano into storage, think long term about your end goal. You do not want to be stuck spending hundreds or thousands of dollars on a piano you may never get out of storage again.
If I can be of any help to you, please reach out to me at Robert@LivingPianos.com. We have many resources available for you here at LivingPianos.com, Your Online Piano Resource.
Over the years, I gradually worked my way up through different pianos. At one point I had a Young Chang 6’1″, and from there I upgraded to a Baldwin L. Each instrument was a step forward, both musically and personally.
Then something unexpected happened. My top piano technician, who was a concert technician, owned an older Mason & Hamlin BB. For those of you who may not know, the BB is a 7-foot grand known for its massive construction and rich tone. Mason & Hamlin pianos have a distinctive depth of sound, and this one was particularly special.
What made it extraordinary was not just the design, but the care it had received. It belonged to a master technician. The regulation and voicing were superb. Everything about the instrument felt refined and responsive. When he decided to move away, he asked me to sell the piano for him. The moment I played it, I knew I wanted it myself. So I sold my piano and bought the Mason & Hamlin. I truly believed I had found the ultimate instrument.
An Offer I Did Not Expect
Not long after that, a concert pianist came in looking for a piano for a friend. At the time, I had a Baldwin L for sale. He tried it and liked it. Then he sat down at my Mason & Hamlin. I told him it was not for sale. He understood, but he kept playing it anyway.
A few days later, he returned and played both pianos again. This time, he made me an offer to purchase both instruments. It was not an easy decision. The Mason & Hamlin was supposed to be my piano. But the offer was significant, and I reluctantly agreed.
Almost immediately, I felt what you might call “seller’s remorse.” I realized that if I ever wanted something equal or better, I would have to look for a 9-foot concert grand. So that is exactly what I did.
Searching for the Ultimate Concert Grand
I brought my technician with me as we searched far and wide for the right instrument. At one point, I even purchased a 9-foot Baldwin in San Francisco. We brought it back and worked on it extensively. It was a fine piano, but it was not quite the extraordinary instrument I was hoping to find.
Then we discovered a Baldwin SD-10 concert grand in the San Fernando Valley. This is a 9-foot concert grand and one of the great American pianos. From the first notes, it was clear this was something very special. My technician told me it was one of the two or three finest pianos he had ever encountered, and he had worked on countless concert instruments. I absolutely loved that piano.
A Piano That Inspired Pianists
We used that Baldwin SD-10 for a concert series, and pianists who performed on it consistently praised it. Many told me it was the best piano they had ever played. It had power, warmth, and remarkable control across the entire range of the keyboard. It was everything I had hoped to find.
A Change of Circumstances
At the time, we were in a loft with 19-foot ceilings, and the piano filled the space beautifully. However, when we moved to a smaller location, it became clear that the instrument was simply too powerful for the room. It was more piano than the space could comfortably handle.
After much thought, I decided to put it up for sale. There was strong interest from around the country. Two different concert organizations were seriously considering purchasing it, and we even discussed the possibility of my performing a dedication recital when the piano was installed. It seemed like the perfect way to pass along such a remarkable instrument.
An Unexpected Buyer
Because those organizations needed board approvals, the process took time. Meanwhile, one Sunday afternoon, an elderly couple came in from the desert. They had seen the piano listed online and wanted to see it in person.
The gentleman sat down at the piano and played just one thing. He stood up and said, “I’ll take it.”
The one piece he played on that piano was Chopsticks!
Where It Ended Up
After all the performances, all the praise from accomplished pianists, and all the discussion of concert halls and dedication recitals, the greatest piano I ever owned ended up in a private home in the desert… For Chopsticks. So I have some mixed feelings about the sale of that piano.
So that is what happened to the greatest piano ever made, at least in my experience. If you have your own story about remarkable pianos, share them in the comments here at LivingPianos.com and on YouTube! Thanks again for joining me.
Welcome to LivingPianos.com. I’m Robert Estrin. Today we are talking about a seminal question: whether it is better to buy a new Steinway or a vintage Steinway. You might wonder why anyone would buy a 100 year old piano instead of a brand new one. I get this question all the time, and technicians debate it endlessly. Some say old pianos are junk. Others say they do not make them like they used to. So who is right? Let’s break it down.
The Wood Makes a Difference
The first point is the wood. In the 1920s and 1930s, and even earlier, piano makers had access to old growth wood. Today, most woods are plantation grown. Older woods tend to have tighter grain, which produces greater resonance and depth of sound. There are even major challenges now in obtaining Sitka spruce from Alaska, which is protected. This has created a real crisis in sourcing the finest tonewoods that were once commonly available to piano manufacturers.
Hand Building Versus Machines
Another important factor is how pianos are built. Modern pianos rely heavily on CNC machines, which stands for computer numerical control. These machines are incredibly consistent and precise. Vintage pianos, on the other hand, were hand built. Each one has its own individual personality. When you find a good vintage piano, it has a soul that machines simply cannot replicate. That individuality is something many pianists find irresistible.
The Golden Age of Piano Manufacturing
If you go back to the period before World War Two, there were over one thousand piano companies in operation. Only about 300 or 400 of them were full scale manufacturers, with the rest being smaller assemblers or short lived firms. Still, it was the heyday of piano manufacturing in America. Compare that to today, when only a couple of companies are producing perhaps two or three thousand pianos a year. It was truly a different era.
Why Old Pianos Can Be a Problem
Here is where many people get burned. Pianos are not violins. Violins tend to improve with age, but pianos are machines that wear out. Old strings, cracked soundboards, and worn actions mean that many vintage pianos are essentially furniture unless they are properly restored. To unlock the magic, restoration is essential.
The Hybrid Solution
The solution is a hybrid approach. For example, my piano is a Steinway Model S that my grandfather bought for my father in the early 1940s. It was built in the late 1930s, and it has since been completely rebuilt. You get the original rim, the case, and the structural elements that cannot be replaced. If you are lucky, you also retain the original soundboard, which can be resurrected to produce a magnificent tone. All of the action parts can be rebuilt using Steinway or Renner components. Hammers might be from Steinway or Abel, depending on what is most appropriate for that particular piano.
This is why it is critical to work with a rebuilder who truly understands pianos. Not every Steinway performs best with current Steinway parts, even though Steinway now owns Renner. When done correctly, you can install new strings and a new action while preserving the tonal beauty of old growth wood. This approach gives you the stability of a new piano combined with the tone of aged wood. You can hear a beautiful pianissimo and a gorgeous, singing sustain. That is what people mean when they talk about singing wood from old growth forests. You also get tremendous power and a deep bass growl that is hard to find in most new pianos unless you are spending well into six figures on top tier instruments.
What About Consistency?
One advantage of buying a new piano is consistency, and that is generally true. However, new pianos also have a break in period. During the first couple of years, strings stretch, felt parts settle, and everything gradually seats into place. So the real question is whether you can hear the difference. Listen to Asian production pianos. Listen to new Steinways. If you have tried new Steinways, how do you feel they compare to vintage instruments? I would love to hear your thoughts. Leave a comment at LivingPianos.com, we are Your Online Piano Store!
Also see: New Vs. Vintage Steinway – What They DONT’T tell you:
Here is a fascinating topic that brings together physics, instrument health, and human physiology. A viewer named Jon, from Houston, wrote a great question about wintry weather and its effects on both pianos and pianists. Having moved from Southern California to Cleveland myself, I can tell you the adjustment to cold climates is significant. Jon asked what happens when a piano sits near a big glass window where a cold air downdraft pours down. How does this affect tuning, the soundboard, the action, and even our ability to listen and play when we’re cold?
The Science Behind Downdrafts
Jon used a keyword: downdraft. Many people love the look of a grand piano in a bay window, but there is real science that explains why this is dangerous. It all comes down to convection. Glass becomes cold during winter. When warm air hits that cold surface, it instantly cools. Cool air is heavier, so it sinks. This creates a continuous convection current, a literal waterfall of cold air cascading over your piano at all hours!
Why Cold Air Damages Pianos
It isn’t just the temperature that does the damage. The real culprit is humidity, or more accurately, the lack of humidity. Cold air cannot hold moisture, so that invisible waterfall is actually a steady stream of extremely dry air. When it hits the soundboard, the wood shrinks. The crown, that subtle arch responsible for projection and tone, begins to flatten. The result is loss of sustain, loss of power, and a deadened tone.
Worse yet, the two sides of the piano experience different environments. The window side becomes cold and dry, while the room side stays warmer and more humid. This uneven exposure can cause the soundboard to warp, throwing the tuning not just flat but chaotically out of alignment.
Effects on the Piano Action
The thousands of moving parts inside a piano are made of wood, felt, and metal. Felt bushings create controlled friction at pivot points, but in the cold they stiffen and harden. This results in sluggish action. You may notice in winter that keys don’t return as quickly and the whole instrument feels resistant. That’s the felt reacting to dry, cold air.
Can Pianists Play Well When They’re Cold?
Cold hands are more than just uncomfortable. When we’re cold, our bodies conserve heat by sending blood to the core, leaving our hands with reduced circulation. The small interosseous muscles between the fingers stiffen, and the synovial fluid that lubricates the joints becomes thicker. This increases internal friction in the knuckles, making fast or intricate playing physically impossible. And if you’re shivering, your concentration and critical listening ability suffer too.
Protecting Your Piano and Your Hands
Heavy drapes or thermal curtains can help reduce cold drafts, but the best solution is to move the piano away from the window. Don’t let a beautiful view compromise the health and tone of your instrument!
For your hands, a simple and effective strategy is to run them under warm water before practicing. Not hot, just warm enough to promote circulation and help the synovial fluid flow freely. This small step can make a tremendous difference.
Thanks for the great question, Jon! Keep your pianos warm and properly humidified, and keep yourselves warm as well. Your piano and your playing will both benefit.
I hope this is helpful for you! Share your thoughts in the comments here at LivingPianos.com, Your Online Piano Resource and on YouTube.
Welcome to LivingPianos.com. I’m Robert Estrin. Today we’re going to explore some of the groundbreaking composers who revolutionized classical piano music. Now, this could easily be a ten-week course or span an entire semester. There are so many important figures, but I’ll focus on a few of the most influential composers who opened up vast new possibilities in piano composition.
From Baroque Restraint to Classical Clarity
Let’s start with Bach. Of course, the piano hadn’t even been invented during his lifetime. His music was primarily written for the harpsichord or clavichord and is highly contrapuntal, with voices weaving tightly together. The writing tends to stay within a narrow range without many large leaps.
Even moving forward to Mozart, whose works were written for the early piano, the textures remain relatively close-knit. Take, for example, his Sonata in C major, K. 545. If you listen to the second movement, you’ll notice how everything stays in a compact register. The hands move in a limited range, and the melodies and accompaniment are very much in the same sonic space. This kind of writing is also typical of Haydn, where the music is refined and structured, but still maintains a tight, elegant character without extravagant gestures.
Beethoven Breaks Boundaries
Naturally, the next step in the evolution of piano composition brings us to Beethoven. He truly expanded what the piano could express. I’ve covered Beethoven’s innovations in other videos, but I want to highlight just one example that showcases something you’d never find in Mozart’s writing.
In the first movement of the “Pathetique” Sonata, Beethoven uses crossed hands in a dramatic way. This isn’t just for show. It adds a layer of complexity and theatricality that was unprecedented. While Mozart might occasionally include brief hand crossings, like in the “Turkish March” Sonata, Beethoven takes it much further. He also introduced a much wider dynamic range, including sudden changes from soft to loud, and vice versa, which revolutionized expressive possibilities on the piano.
Chopin and the Romantic Voice of the Piano
Where do we go from Beethoven? Chopin, of course. Chopin and the piano are almost inseparable. His entire output centers on the instrument, and he introduced a rich variety of textures and techniques that hadn’t been explored before. Take a look at his Ballade in G minor. Let’s consider just a short excerpt. If you play it slowly, without the pedal, it almost doesn’t make sense. It’s a bit like viewing an Impressionist painting up close. You just see blotches of color. But from a distance, everything blends beautifully. Chopin was able to envision these flowing passages and understand how they would sound when played with proper pedal and tempo. The theme that emerges is so lyrical and expressive, yet surrounded by a tapestry of harmonies and textures. His writing pushed the instrument into new emotional and tonal territory.
Of course, Chopin wasn’t alone. We could talk about Liszt, who brought virtuosic brilliance to the forefront. Mendelssohn and Schumann also contributed greatly to the development of Romantic piano music. All of these composers expanded what the piano could do, both technically and expressively.
Into the 20th Century: Color and Complexity
Fast forward to the 20th century and everything changes again. With composers like Ravel, Debussy, and Prokofiev, all conventions are reimagined. For instance, Debussy’s Doctor Gradus ad Parnassum from his Children’s Corner suite showcases a completely different kind of writing. The textures and colors he creates on the piano are almost orchestral. Listen closely and you’ll hear a shimmering, impressionistic style that’s completely different from earlier composers. This continued exploration of timbre and sonority brought piano music into the modern era.
What Comes Next?
The progression of piano writing over time reveals a fascinating journey. Each of these composers built upon what came before, expanding the expressive and technical range of the instrument. We’re fortunate to have such a rich repertoire that showcases the piano’s full potential.
Which composers do you feel expanded the possibilities of the piano in revolutionary ways? Leave your thoughts in the comments. There are so many more we could explore. I could easily create a part two, three, or even four to highlight more of these incredible musical pioneers. Again, I’m Robert Estrin and this is LivingPianos.com, Your Online Piano Resource.