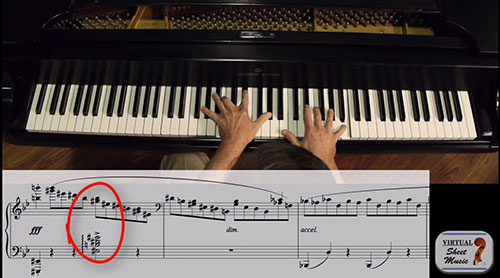
Welcome to our first in a multiple part series on how to approach the Chopin G Minor Ballade. This is an amazing piece of music that exemplifies the manic emotions of Frédéric Chopin swinging from points of incredibly low despair to the heights of ecstasy. Today we are going to discuss some of the middle section because there are a number of techniques that come one after another very quickly.
You are probably familiar with the big heroic middle section that restates the theme and ends with a flurry of octaves.
Let’s start on the descending diminished chord:

The best way to practice this section is to play it slowly and practice getting your fingers in the right place instantly. So, I suggest playing just a few notes at a time and stopping when the hand changes position. For example here:

Play the first few notes and practice getting your hand in the right position above the chord, but don’t play it. Keep playing the passage over and over and stopping until you can get your hand in the right position over the chord in a relaxed manner. You will want to continue doing this for each subsequent group.

If you practice this way you learn to play this passage with much more fluidity and you’ll be ready for each subsequent hand position before you need to play. You need to be able to play each section with ease and this technique is a great way to achieve this.
The next section we are going to discuss will provide a great example of how to be over note groups, in this case, 2 note groups following the bottom notes going up the scale.

You can also practice these 2 notes groups in different rhythms. By practicing in two-note groups, it will force you to come up with a fingering that will accommodate the passage enabling a smooth execution of the passage. After playing this section in two-note groups and getting 100% comfortable with it, breaking it up as it’s written will be almost effortless.
In the next section you can use another technique:

This section is difficult because you have two completely different techniques in each hand. In the right hand, you will want to play fast and light and in the left hand, you will want to delineate the phrasing clearly.
In the right hand, it’s best to practice with the metronome and gradually get your playing up to speed. Start at a slower tempo and continue to play the section until you are absolutely comfortable. When you feel confident in your playing, put the metronome up one notch and practice it again until you are absolutely comfortable. Keep doing this until you are able to play the passage up to speed without issues. As you get faster, concentrate on lightening up your fingers and keep them very close to the keys.
For the left hand, you will want to use a similar technique that we discussed in the first section of this lesson and that is getting your hands over the next set of notes instantly. Keep practicing and stopping before the next group of notes. Practice getting your hands and fingers in the correct position before you play the notes. Keep practicing over and over until your hands and fingers go to the correct notes almost instantly and effortlessly.
Combine the hands once you feel confident with each individually. Remember to keep your right-hand fingers very close to the keys. This section is very tricky because you have two different techniques in each hand. That is why practicing hands separately first is so effective in solving the technical issues.
Stay tuned because next time we will cover the next section of this piece and discuss a new set of techniques. Thanks again for joining me Robert Estrin Robert@LivingPianos.com (949) 244-3729


