We have addressed octave techniques in a couple of past videos: It’s all in the wrist and Piano Exercises – Octaves, among countless other videos in which I talk about certain techniques I will address in this video as well.
This video is quite unique. A couple weeks ago a good friend of mine named Jeffrey Beigel (who studied with my father Morton Estrin) was touring through Southern California. We had time to catch up and even film an extended interview (which you will see on the website and YouTube very soon).
I had mentioned to Jeffrey that I was playing the Liszt B-minor Sonata which contains numerous octaves sections. He immediately went to the piano and started playing parts of the Liszt Sonata and said, “Curl the second finger”. I had never heard this before and I started incorporating it into my octave technique.
In case you are unfamiliar with my video on octave technique, it involves playing from the wrist – as the arms are not fast enough to get the job done in many cases. Jeff’s suggestion was to simply curl the second (index) finger. It works wonderfully by relaxing the hand which allows you to play your octaves more easily.
Thanks again for joining me and I look forward to sharing more of these techniques with you in the future. Robert@LivingPianos.com (949) 244-3729
As a piano teacher as well as performer, I get this question a lot. Many parents wonder if there is a specific age they should start getting their child piano lessons. Should they start now or should they wait awhile?
This is a tough question to answer, because every child is unique. I have seen children at the age of 4 or even younger ready to start piano lessons and I’ve seen children 8 or 9 years old not ready – it is very dependent on the child.
Generally speaking (in my experience), the age range of 6-9 is an almost magical time to start taking piano lessons. This is not an accident. By this age, kids are going to school and learning how to take written direction and how to work independently; these are two major things required in piano study.
When working with children younger than this, it definitely helps if you take an active role in their education and have a background in music yourself. However, some children just have different levels of maturity and teaching them at a young age can be a challenge – they might not want to sit still at the bench for more than a few minutes. In this case, it’s probably a good idea to wait a bit before getting them lessons or teaching them yourself – it’s never good to be in a battle for their attention when it comes to learning a musical instrument.
In any case, one of the best things you can do is to expose your children to music at a young age. Play the piano for them yourself, play recorded music for them to enjoy, play games at the piano, anything that can make music a fun experience for them. Exposure at a young age is a big element in developing talent and understanding the language of music, just as children growing up in a bilingual household can have complete comfort with more than one language.
So when will you know it’s the right time to begin piano lessons? If your child seems genuinely interested, if they can take written direction and if they can complete their homework on their own – these are signs that they are ready for lessons. You will definitely want to consider helping your child once they start lessons because practicing the piano correctly is hard work. If you are learning alongside them it will help in their development.
It is important to encourage your children and make the experience of learning the piano fun for them. For information about a specific situation, I am happy to help in any way I can. As always, check out LivingPianos.com for more blogs and articles in the future.
Memory can be one of the great challenges for musicians. You take the time to learn a piece, practice it again and again, and master it. Then you may forget something! Today we are going to discuss how to retain the music you’ve learned.
In the past we’ve discussed how to memorize music and you may reference that video for tips on that topic.
So, let’s say you have a piece you’ve memorized and you want to make sure you keep it on a high performance level. It might be a piece you played sometime ago, and while you remember most of it, there are certain parts that aren’t secure. Are there any tricks to keeping this information stored in your mind?
The first thing is to play with the score. Now you might be wondering, if you play with the score, doesn’t it negate the idea of memorizing the music? Afterall, it’s the exact opposite! Once you’ve memorized the music, that’s when the real work begins. Playing with the score will help solidify your knowledge of the music. You aren’t going to just play it through though, you study the score playing very slowly with no pedal. Take in all the notes, rhythm, fingering, phrasing and expression. Listen to what is going on in the piece and study it intently. This will greatly enhance your knowledge of the music and reinforce your memory like you never thought possible.
Another important practice tool to reinforce your memory of a piece is to play with the metronome. Make sure that you keep with the metronome and play the music exactly as written. Go through it several times while reading the music and playing with the metronome to make sure the rhythm is solid.
So the three basic ways to reinforce your musical memory:
1. Play slowly with the score 2. Keep your foot off the pedal 3. Play with the metronome
An advanced technique is to play your music away from the piano. Now this might sound strange (after all, how do you play music without the piano?) but it’s a great practicing technique. If you really think you’ve memorized your music, try playing it from memory – you can start by moving your fingers in your lap at first to make it easier. Imagine playing every note and nuance and see how much you really know playing mentally. It can be incredibly challenging but it’s extremely beneficial. Eventually you can play your music in your head by thinking it through. This will allow you to create the exact performance you have in mind without any physical constraints or problems with the instrument. This is a great way to strengthen your memory.
Listening to other performances of your music can also help. But there is nothing better than pulling out the score and referring to it again and again. In order to truly understand a piece and retain it in your mind you need to learn the score and reinforce the memory constantly.
I hope this is helpful and if you have any questions about this topic or any other, please email me Robert@LivingPianos.com for more information.
Welcome back to our second part in our series on how to approach the Bach Two Part Inventions. In Part 1 of our lesson we talked about how to understand these pieces as well as the importance of understanding counterpoint when approaching the inventions.
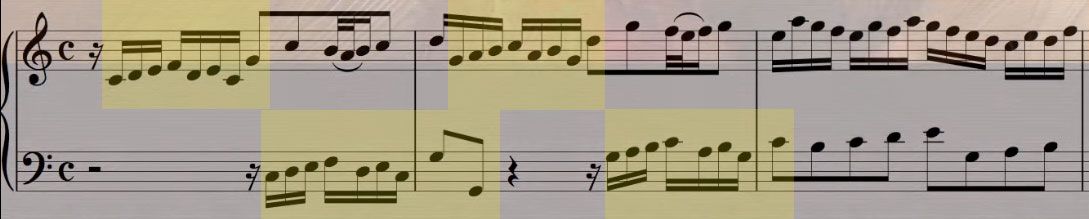
Today we are going to explore Invention #8 – The F major invention. Again, this piece really relies on subject and countersubject for its structure so if you missed the last lesson or you aren’t familiar with the concept of Counterpoint you might want to catch up before you proceed with this lesson.
Let’s start with the first phrase in the piece and separate the subject from the countersubject.
Here is the subject:
And here is the countersubject:
Right away you will be able to spot a difference between the two. You will want to accentuate these differences with the phrasing. To accomplish this I recommend playing the subject staccato and the countersubject legato. This is a great way to delineate the subject from the countersubject and allow them to stand on their own so they don’t meld together.
You should always understand the context in which the piece you are playing was written. In this piece Bach was not writing for the piano. The keyboard instruments during his time didn’t contain sensitivities for dynamics. So, phrasing the parts differently from one-another was an essential component of the performance.
You should play this way through the entire piece and you will separate both the lines clearly and let them stand on their own. When performed correctly it’s truly amazing what type of sound this achieves and it’s even more amazing to think that Bach was developing this effect without the aid of the modern piano. If you were to play everything with the same phrasing the piece would sound fine but it would sound flat and lacking the life that Bach intended.
As you play further into the piece you can utilize dynamics (such as playing piano or forte in different sections). But the phrasing is what’s going to separate the two lines and bring life to the piece and highlight the brilliant counterpoint within.
What makes these pieces great is that you are free to develop phrasing and dynamics on your own and bring unique expression to these pieces. Bach didn’t write dynamic or phrasing markings and it’s not because he didn’t want them. It’s because it’s up to the performer to bring their own unique voice to these works. Have fun with these inventions and experiment; don’t be afraid to try something new!
Thanks again for joining us here at Living Pianos. info@LivingPianos.com (949) 244-3729
Welcome to the first part in our series on Bach’s Two Part Inventions. These are masterful works that are not very long but brilliantly conceived. If you’re looking for something short and challenging to practice these could be a great choice for you.
Let’s start by breaking down exactly what is meant by “two part invention”. This phrase simply means it is a type of 2-voice counterpoint (for more information on this subject please watch our video on What is Counterpoint?) To put this simply, there are two different lines of music and at no point are there more than two different notes playing at the same time in just about the whole piece. Even with these limitations this is an amazing composition that’s built with a subject and a countersubject. Being able to delineate these two phrases is what makes counterpoint so special.
A great way to separate the subject from the countersubject is to phrase them differently from one-another.
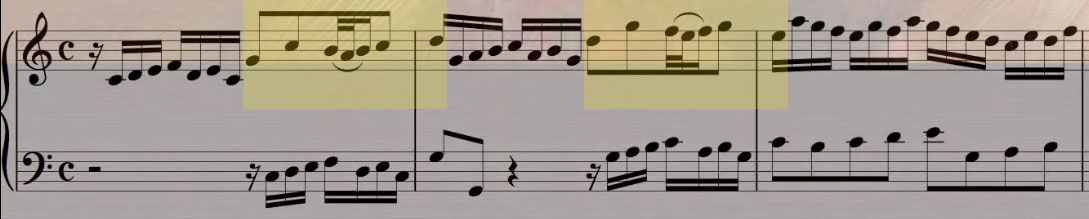
For example, in the first phrase you have this as your subject:
And this as your countersubject:
In this particular piece the subject and countersubject are incredibly similar. So how should you make each one stand out? Well you might notice that a few bars into the piece the countersubject has elongated eighth notes.
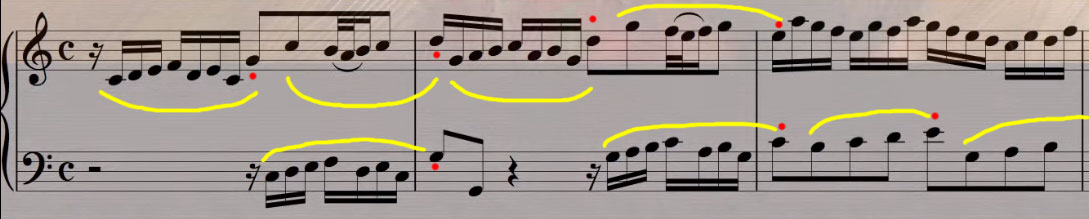
A great way to delineate these notes is to play them legato and in groups; with the last note being short. This is a great way to separate the countersubject from the subject.
The beauty of Bach is that there is really no right or wrong. A lot of his music is open for interpretation so if you wanted to play the phrasing completely differently it can work just as well. Why is this? Because Bach rarely wrote phrasing into his music. It is up to you come up with the phrasing.
Unlike later music that has melody and harmony and obvious distinctions between the two, these Bach Inventions have intertwining melodies instead. So for now have fun and experiment with these pieces. When we return we will have more videos for you on these inventions that show even more extreme examples of delineation between subject and countersubject.
Thanks so much for joining me here at Living Pianos. If you have any questions please feel free to contact us directly: info@livingpianos.com (949) 244-3729.
If you play Classical Piano you have undoubtedly run into Charles Louis Hanon’s The Virtuoso Pianist. It contains valuable exercises as well as the standard fingering for all major and minor scales and arpeggios. My father Mortin Estrin www.MortonEstrin.com taught these to me and now I am sharing them with you.
While the full text for Hanon is quite large, he includes numerous exercises, all the major scales and arpeggios as well as scales in different intervals. In this video we will be covering some of the early lessons which can be very helpful if you continue practicing them a little bit every day.
It is essential to practice Hanon exercises as well as scales and arpeggios with the metronome. Why? Because the whole idea is to develop precision and evenness in your playing – for both timing and volume of each note. The metronome is an essential tool for the musician as the tape measure is for the carpenter.
For the first exercises, set the metronome at 60 beats to the minute and practice one note to the beat playing definitely. The video above provides a good example of this. Notice that when playing the exercise only the fingers are working. Utilizing raised fingers trains your hands to delineate each note. You must avoid any arm motion in these exercises. Play the entire exercise about 4 times through at one note to the beat playing at a fairly strong volume. Once you feel comfortable, try to play two notes for every beat. Make sure you continue to use only the fingers and not resort to arm motion. Why no arms? The whole idea of Hanon is to develop strength to play fast and the arms are too large to move quickly. Developing a strong finger technique is essential for fast scales and arpeggios.
Once you work your way up to 4 notes to the beat on these exercises, you will find it’s nearly impossible to lift the fingers and play fast.
The faster you play, the closer the fingers must be to the keys. Simply put, Faster = Lighter
There is no way to play with great strength or extreme movement in fast passages. Be sure to keep the fingers naturally rounded. This is necessary since your fingers are not the same length; by rounding them it makes all the fingers align at the same point on the keys.
The whole routine should take about ten minutes. If you continue to practice this every day you will find yourself developing more finger strength. It also provides a great warm up.
I would recommend doing one Hanon exercise per week. Once you have mastered 10 exercises, you should have enough strength to graduate to scales. If you master one scale or arpeggio each week, after a year you will have learned all of you major and minor (harmonic and melodic) scales and arpeggios, all with just 10 minutes per day! As your technique grows, you can adjust the metronome speed faster and faster over time.
Next week I will discuss scales and arpeggios in Hanon. Thanks again for joining me, Robert Estrin Robert@LivingPianos.com (949) 244-3729