Welcome to LivingPianos.com, I’m Robert Estrin. Today I’m going to talk about why an okay hand position is ideal at the piano. Now what do I mean by this? Wouldn’t you want a great hand position at the piano?
I don’t mean an okay hand position, I mean the okay hand position.
You probably know this gesture. Your thumb and index finger are touching, forming a circle, while your other three fingers are gently outstretched. This hand position, believe it or not, is the ideal hand position on the piano!
Why would you want your second finger curved like this?
By having the second finger curved more than other fingers, you actually are in an ideal position for octaves and chords. If you just take your hands and drop them on the piano without using any muscles at all, you’ll find they naturally will go into this position. So this is the position you want to be in on the piano. An okay position is the ideal position on the piano! You can use that as a little reminder as to how your hands should be placed on the keyboard.
It’s not a tight position.
You’re not trying to keep your hands in that position with force. In fact, your hands will automatically stay in that position if you just let them come down naturally on the keyboard. With no force at all, your hands will fall into that position. Because it takes no effort to maintain, it is the best position on the piano. What’s great about this is by rounding your second finger more than the others, you can accommodate chords and octaves with much greater ease. I hope this little tip is helpful for you! Thanks again for joining me, Robert Estrin here at LivingPianos.com, Your Online Piano Resource.
For premium videos and exclusive content, you can join my Living Pianos Patreon channel! www.Patreon.com/RobertEstrin
Contact me if you are interested in private lessons. I have many resources for you! Robert@LivingPianos.com
Welcome to LivingPianos.com, I’m Robert Estrin. Today’s subject is about how to feel dotted rhythms. What does a dot do to a note? That’s a good question. A lot of people say a dot after a note adds half the value of the note. That can be kind of confusing because if you have a quarter note, half of a quarter is an eighth. Particularly if you’re teaching piano to children and you say, “How much is a quarter plus an eighth?” You’re going to get a glazed look in their eyes. So another way of looking at what dots do to notes is to say that a dot after a note adds the value of the next faster note.
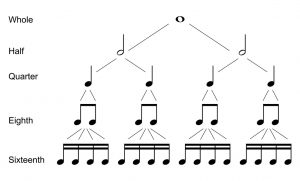
All the note values are half the value of each successive note.
A whole note contains 2 half notes. A half note contains 2 quarter notes. A quarter note contains 2 eighth notes. An eighth note contains 2 sixteenth notes. So a dot on a whole note adds a half note to the whole note. A dot on a half note adds a quarter note to the half note. A dot on a quarter note adds an eighth note. You get the idea. It’s always adding the next faster note. There’s another way of looking at this.
A dot after a note adds the next faster note, but it also equals three of those notes.
If you have a dotted whole note, that makes a whole note plus a half note. That’s a total of three half notes. It’s the same thing. A dotted half note equals a half note plus a quarter note, which is three quarter notes. Why am I bringing this up? Because a dotted rhythm usually means that you have a dotted note, followed by the shorter note. So, for example, if you have a dotted eighth note, that’s an eighth note plus a sixteenth note, which is 3 sixteenth notes. Usually it will be a dotted eighth followed by a sixteenth. So you have 3 sixteenth notes basically tied together, followed by another sixteenth. So in counting in 3/4 time, for example, in Clementi’s Sonatina in G major Opus 36, the second movement has a dotted rhythm. If it was a fast enough tempo, imagine having those 16th notes ticking on your metronome. That would be ungodly fast! Metronomes don’t even typically go that fast. Trying to play with that would be hard. So what can you do about that to make it easier?
First, I want to show you what the danger is with dotted rhythms.
The dotted rhythm is a total of four subdivisions, three plus one. So it can be very easy for your rhythm to degenerate into a triple division like in 6/8 time. For example, having a quarter followed by an eighth. A quarter note contains 2 eighth notes. So this should be a total of three divisions, two plus one, instead of the three plus one that a dotted rhythm is, as I explained earlier. So how do you get the precision of the dotted rhythm so it doesn’t sound like a triple division?
I have a dotted rhythm hack!
Instead of having the metronome ticking 16th notes, suppose you have just the eighth notes ticking. Put the metronome at half the speed. But I’ve got another further little trick for you. Put it even at half the speed of that! Just have the second eighth of each beat ticking. Then you just have the 16th come between the tick and the next note. That eighth note is the pulse you have to feel in order to fit the dotted rhythm in so it’s not approximate and it doesn’t degenerate into a triple feel. You can experience this for yourself with the accompanying video.
So that’s the way to feel dotted rhythms!
Feel that second eighth note and just fit the 16th between the second eighth and the next beat. I hope this makes sense to you! If you’re trying this on your own, I suggest you first have eighth notes ticking and practice just by clapping. Put the metronome on with eighth notes ticking, and then fit the sixteenth notes in where they belong. That’s the dotted rhythm tip for the day. I hope it’s helpful for you! Let me know in the comments here at LivingPianos.com and YouTube! Thanks again for joining me, Robert Estrin here at LivingPianos.com, Your Online Piano Resource.
For premium videos and exclusive content, you can join my Living Pianos Patreon channel! www.Patreon.com/RobertEstrin
Contact me if you are interested in private lessons. I have many resources for you! Robert@LivingPianos.com
Hi, I’m Robert Estrin and this is LivingPianos.com. Today’s subject is about how to identify notes on the piano. You have 88 keys on the piano. What are they? I’m sure many of you already know the answer to that question. But for those of you who don’t know what the keys are on the piano, I will explain. We get a lot of pianos here at Living Pianos. Sometimes somebody has carefully put little letters on every one of the keys across the keyboard. Is that necessary? No, it’s not necessary! So, how can you figure out all these notes?
Why do pianos have black and white keys?
I have a video on that subject which you can watch here. The simple answer is, if they were all white keys, you wouldn’t be able to find any of the notes. You would have no reference. If you look at the way the piano keyboard is oriented with groups of two and three black keys, it’s a repeating pattern. Now, here’s how to find the notes on the piano. You have groups of two black keys and groups of three black keys. Any group of two, if you go to the white key just to the left, that is C. Now, what is so significant about that? Well, from there, you can go up the alphabet on the white keys. C, D, E, F G. Then it continues with the first letter of the alphabet. A, B, C. The octave higher C is also below two black keys. So now you can find all the keys on the piano. Any time you have two black keys, the note to the left is a C. The highest note on the keyboard is also a C.
What about the black keys?
The black keys are designated by either sharps or flats. But white keys can also be sharps or flats. Any two keys that are next to each other, black or white, are all called half steps. Two keys together with no keys between are a half step apart. There are white keys that are a half step apart. So what’s the significance of this?
A sharp raises a note a half step.
If you have a C sharp, it raises it a half step to the black key to the right of C. If you have D sharp, it would go up a half step as well to the black key to the right of D. You can even have an E sharp. It would be the same key as F on the piano because a sharp raises a note by a half step, and the next key on the piano is a white key.
There are also flats which lower notes by a half step.
It’s the same principle. So if you have a C flat, it’s the same key as B on the piano. But it would be indicated in your score as C flat. A B flat would be a half step lower than B, etc. So that is the way black keys are designated on the piano. You may wonder why white keys would sometimes be indicated with flats or sharps. Scales are written diatonically with all the letters in order without skipping or repeating any. On the staff they appear on consecutive lines and spaces. They are actually easier to read that way, believe it or not!
I hope this is helpful for you! Now you know all the notes on the piano. You can figure all 88 out just from that brief tutorial. Thanks again for joining me, Robert Estrin here at LivingPianos.com, Your Online Piano Resource.
For premium videos and exclusive content, you can join my Living Pianos Patreon channel! www.Patreon.com/RobertEstrin
Contact me if you are interested in private lessons. I have many resources for you! Robert@LivingPianos.com
Hi, I’m Robert Estrin and this is LivingPianos.com. I’m here with an incredible practicing tip that will turbocharge the work you do at the piano: Assembly line practicing. What is this all about? I’m going to tell you all about it and how it relates to your piano playing. Early in the 20th century, Henry Ford revolutionized automobile manufacturing by making the assembly line.
The assembly line lets people work on all stages of development simultaneously.
Another great example of this is the post-World War II housing boom. I grew up on Long Island adjacent to Levittown, where potato fields were transformed into whole neighborhoods seemingly in an instant. How was this done? Previously, houses were built from the beginning to the end. Then when the houses were finished, the builders would move on to the next house. Well, there’s a much more efficient way. If you’ve ever been to a neighborhood being built, you see tractors digging dirt. You go a little further and see foundations being laid. Further still you see frames of houses being assembled. Then the electrical and plumbing are being put in. When you get to the very end of the neighborhood, there’s the model home. All the work is being done on all these multiple stages of development simultaneously. It’s an incredibly productive way of building neighborhoods.
How does this relate to your piano practice?
If you have watched my videos, you are probably aware of the way I practice, and the way I teach my students to practice. Rather than practicing a whole piece and eventually trying to memorize it, you flip it. Read through the piece a couple of times, then get right down to work and start memorizing a little chunk at a time. However, this type of practice is incredibly mentally challenging. Everyone thinks that it’s hard just for them, but it’s hard for everyone if you’re doing it right! Let’s say you’re learning a new piece. You learn as much as you can and it’s enough for the day. The next day you can refine what you’ve done the previous day. But you also forge forward.
Eventually you have music at many different stages of development.
The first section is at performance level, like that model home or the finished car coming off the assembly line. Later on, maybe after the double bar in the development section of a sonata movement, it needs further polishing. So you work to refine that. You’re trying to refine what you learned the day before and solidify your memory. Yet you are always memorizing new material to add to the pipeline for the next day.
Your practice becomes exponentially more productive.
You can’t just memorize for an entire practice session. There’s a point of diminishing returns of your effectiveness. There’s only so much you can absorb at one time. So you memorize what you can. Then you refine what you did the previous day and the days before that. The first sections of a piece may be at performance level, especially a multi movement work. You might have the first movement at performance level. The second movement is coming along. This is what I mean by assembly line practice. It’s so effective if you can work on different stages of development all at the same time. Instead of just working on a whole piece and trying to get it up to a high level, then go on to the next piece, you work on all different stages of development within the work. You can even be working on the second and third movements while you’re doing the final polishing on the first movement. I hope this is helpful for you! Thanks again for joining me, Robert Estrin here at LivingPianos.com, Your Online Piano Resource.
For premium videos and exclusive content, you can join my Living Pianos Patreon channel! www.Patreon.com/RobertEstrin
Contact me if you are interested in private lessons. I have many resources for you! Robert@LivingPianos.com
Hi, I’m Robert Estrin and this is LivingPianos.com. The subject today is about having a pulse in your music. Your music must have a pulse or it dies! Now that’s an intense statement, but it’s true. Sometimes you listen to seasoned concert artists who become so self-indulgent in their playing that they lose the beat of the music. It really loses its whole energy and purpose when you don’t have the pulse to guide everything and hold on to the structure.
This happens oftentimes in slow pieces.
People think they’re playing very expressively by having so much freedom. A great example of this is in Clair de Lune of Debussy. You might hear somebody start really slowly, but then they lose the pulse! You’re left with this wishy washy wandering sound that isn’t anchored in the music anymore. There’s nothing about it that is implied in the score. Debussy wrote this piece, and it has a beauty that is revealed when the real rhythm is played. The secret then is figuring out what note value the pulse is. If you look through the score, you’ll see eighth notes, since it’s in 9/8 time. So if you have eighth notes ticking, it becomes very difficult because you have tuplets. So you have to fit in two notes to 3 ticks of the metronome which is very difficult.
The pulse needs to be slower.
In the case of Clair de Lune, the pulse is actually the dotted quarter note! When you get down to a reasonable pulse rate, you can feel the music. It’s the same tempo, but with a pulse only ticking on the dotted quarter notes instead of on every eighth note. You have this nice, relaxed pulse. Within that framework there’s so much freedom! You feel the pulse. Then you have the liberty to nuance the notes within that pulse of the larger beat. That is the secret.
Sometimes you can have a pulse so slow that it gives you tremendous freedom.
For example, in Chopin’s Nocturne in B-flat Minor. Play it at a tempo of 90 to the quarter note, and you’ll see how constrained it feels having to fit the notes into that many pulses. This pulse is pretty darn fast! It’s not very relaxing. It sounds very regimented and robotic by quantizing everything to that exact beat. Because it’s not really the beat. The beat should be felt as the unit of six eighth notes. If you take the metronome down to 30 (on a metronome application on your phone), you have a tick for the dotted half note. It’s very slow, but there’s a pulse there. There is a freedom that you have in your playing when you have a slower pulse. Rachmaninoff said, “The larger the phrase, the greater the musician.” And I believe that the slower the pulse, the more control you have. It’s easier to maintain tempo. This is true of everything, particularly fast movements. If you try to play a fast movement while you’re thinking of every eighth or sixteenth note, maintaining tempo is difficult.
Now, for initially getting the music under your fingers, having the pulse on the faster note can be beneficial. It helps you to be absolutely sure of the rhythm and that you’re playing honestly. Playing this way is actually very instructive. But once you have the piece moving more, thinking the longer beat as the pulse can give you freedom within the beat and makes it easier to maintain your tempo. Try it for yourself with your music and let me know how it works! I hope this has been helpful for you! Thanks again for joining me, Robert Estrin here at LivingPianos.com, Your Online Piano Resource.
For premium videos and exclusive content, you can join my Living Pianos Patreon channel! www.Patreon.com/RobertEstrin
Contact me if you are interested in private lessons. I have many resources for you! Robert@LivingPianos.com
Welcome to LivingPianos.com, I’m Robert Estrin. The subject today is about whether you should look at your hands when you play from memory on the piano. This is a really insightful question that someone asked me recently. There are two distinctly different ways of playing the piano. One is playing from memory and the other is reading the music.
When playing with the music, you should strive to keep your eyes on the score the entire time.
You only want to have brief glances at the keys. When you do look at the keys, it must be just your eyes moving. If you play the piano and you are looking at the music ,you can’t look away. You can’t read what you’re not looking at! When playing from the score, you absolutely must keep your eyes on the music.
What About Playing From Memory?
Oftentimes I have students memorize music. At the very first lesson I show my students how to memorize. This is something that almost nobody ever teaches. You think it’s magic that pianists could assimilate all this music. Are pianists some kind of geniuses? No. You just have to know how to memorize. You have to take little chunks of music and build the whole composition bit by bit. When you hear somebody play, it seems like a miracle. But really, if you see what’s behind the curtain, it’s just a lot of little steps that go into it.
I have my students play from memory. The first time they do it, a lot of times they’ll be looking up into space. I always tell them to look at their hands. One of the reasons to memorize music is so that you can look at your hands! When you have leaps, how are you supposed to land in the right place without looking at your hands? Having said that, there are some blind pianists who defy all reason bouncing all over the keyboard. They don’t rely upon looking. That’s great for them. But for everyone else, you have your eyes to utilize so you might as well take advantage!
Looking at your hands is another way to reinforce your memory.
By looking at your hands you see the connections of the keys. You know where to look if there are leaps. A lot of times what you want to do when you’re playing the piano is look at your thumbs rather than the extreme outside fingers. The thumbs can line up everything and they’re close together. When you have leaps, you tend to want to look at the inner part of your hand. That’s one little tip for you.
Does this mean that you should never try to play without looking?
No. The time for that is when you memorize a piece of music. That doesn’t mean you’re done with the score. Far from it. It’s exactly the opposite! The way I learn music, and the way I teach my students to learn music is to read through it a couple of times the first day, then get down to work and start memorizing. The first thing you do is memorize your music, instead of the last thing. Then what do you do? You go back to the score and reinforce the memory by reading the score and keeping your eyes on the music. That’s the time for not looking at your hands. Read from the score to see all the little details that maybe you didn’t catch the first time. Maybe you forgot where a slur ends or a crescendo begins, or the voicing of a chord. You have to constantly go back and reinforce your memory.
Interestingly, you can play the piano without any instrument or anything visual at all.
I have a video about playing the piano from your mind. You can just sit in a chair and play through your music mentally, thinking through every nuance of sound and touch. That is the ultimate practice. You can try it with a piece you know really well. You want to make sure you reinforce that memory. There is no better practice. You don’t have the benefit of finger memory. You don’t have the keyboard to look at or the sound to go by. It’s all in your head. Interestingly, there have been tests of people playing the piano while having their brains scanned. Then they get people to think about playing the piano while doing the same brain scan on the same people. There is zero difference in the brain whether you are playing the piano or thinking about playing the piano. Now, what does this reveal? It tells you that you can practice away from the piano effectively and get all the benefits. You can reinforce the score just using your mind.