Welcome to LivingPianos.com, I’m Robert Estrin. Today’s subject is about how to feel dotted rhythms. What does a dot do to a note? That’s a good question. A lot of people say a dot after a note adds half the value of the note. That can be kind of confusing because if you have a quarter note, half of a quarter is an eighth. Particularly if you’re teaching piano to children and you say, “How much is a quarter plus an eighth?” You’re going to get a glazed look in their eyes. So another way of looking at what dots do to notes is to say that a dot after a note adds the value of the next faster note.
All the note values are half the value of each successive note.
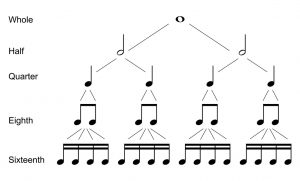
A whole note contains 2 half notes. A half note contains 2 quarter notes. A quarter note contains 2 eighth notes. An eighth note contains 2 sixteenth notes. So a dot on a whole note adds a half note to the whole note. A dot on a half note adds a quarter note to the half note. A dot on a quarter note adds an eighth note. You get the idea. It’s always adding the next faster note. There’s another way of looking at this.

A dot after a note adds the next faster note, but it also equals three of those notes.
If you have a dotted whole note, that makes a whole note plus a half note. That’s a total of three half notes. It’s the same thing. A dotted half note equals a half note plus a quarter note, which is three quarter notes. Why am I bringing this up? Because a dotted rhythm usually means that you have a dotted note, followed by the shorter note. So, for example, if you have a dotted eighth note, that’s an eighth note plus a sixteenth note, which is 3 sixteenth notes. Usually it will be a dotted eighth followed by a sixteenth. So you have 3 sixteenth notes basically tied together, followed by another sixteenth. So in counting in 3/4 time, for example, in Clementi’s Sonatina in G major Opus 36, the second movement has a dotted rhythm. If it was a fast enough tempo, imagine having those 16th notes ticking on your metronome. That would be ungodly fast! Metronomes don’t even typically go that fast. Trying to play with that would be hard. So what can you do about that to make it easier?
First, I want to show you what the danger is with dotted rhythms.
The dotted rhythm is a total of four subdivisions, three plus one. So it can be very easy for your rhythm to degenerate into a triple division like in 6/8 time. For example, having a quarter followed by an eighth. A quarter note contains 2 eighth notes. So this should be a total of three divisions, two plus one, instead of the three plus one that a dotted rhythm is, as I explained earlier. So how do you get the precision of the dotted rhythm so it doesn’t sound like a triple division?
I have a dotted rhythm hack!
Instead of having the metronome ticking 16th notes, suppose you have just the eighth notes ticking. Put the metronome at half the speed. But I’ve got another further little trick for you. Put it even at half the speed of that! Just have the second eighth of each beat ticking. Then you just have the 16th come between the tick and the next note. That eighth note is the pulse you have to feel in order to fit the dotted rhythm in so it’s not approximate and it doesn’t degenerate into a triple feel. You can experience this for yourself with the accompanying video.
So that’s the way to feel dotted rhythms!
Feel that second eighth note and just fit the 16th between the second eighth and the next beat. I hope this makes sense to you! If you’re trying this on your own, I suggest you first have eighth notes ticking and practice just by clapping. Put the metronome on with eighth notes ticking, and then fit the sixteenth notes in where they belong. That’s the dotted rhythm tip for the day. I hope it’s helpful for you! Let me know in the comments here at LivingPianos.com and YouTube! Thanks again for joining me, Robert Estrin here at LivingPianos.com, Your Online Piano Resource.
For premium videos and exclusive content, you can join my Living Pianos Patreon channel! www.Patreon.com/RobertEstrin
Contact me if you are interested in private lessons. I have many resources for you! Robert@LivingPianos.com