How to Use the Pedal on the Piano – Keyboard kaleidoscope – Robert Estrin
This is a thorough exploration about pedaling on the piano which I produced a number of years ago. This is a longer format production I hope you will enjoy!


This is a thorough exploration about pedaling on the piano which I produced a number of years ago. This is a longer format production I hope you will enjoy!
The third part in my series on Hanon’s Virtuoso Pianist comes from a viewer question about how much to practice these lessons. In case you missed them here are the first two parts in my series on:
Part 2 – How to Practice Scales and Arpeggios
Believe it or not, there is such a thing as over-practicing exercises. One of the great things about the piano is that there is a wealth of music – so much so that it would be impossible to learn it all in a lifetime. So why practice strictly exercises when there is so much other music you could be learning and playing?
There are some instances in which you will need to correct technical problems with your playing and develop fluid a technique. Scales and arpeggios are a great resource for this. But how much is too much practice when it comes to exercises?
Generally, you should think of these as a warm-up to your practice session. If you dedicate 10 minutes to the beginning of your daily practice to focus on scales, arpeggios, or other exercises, it will benefit you immensely. What’s most important for your progress is the consistency of practice.
There may be times in your musical development when exercises can be critical in expanding your technique and developing strength. However, you should not ignore repertoire. You can continue to develop your strength and technical prowess while learning music as well – after all, we learn our instruments to play music!
Thanks again for joining me Robert Estrin: Robert@LivingPianos.com (949) 244-3729
The third part in my series on Hanon’s Virtuoso Pianist comes from a viewer question about how much to practice these lessons. In case you missed them here are the first two parts in my series on: Part 1 – The First Lessons Part 2 – How to Prac
Welcome to another part in my ongoing series featuring tips for Schumann’s iconic “Scenes from Childhood”. In part 1 of the series I talked about how this collection of pieces is a perfect choice of repertoire for intermediate to advanced students. Each piece has a distinct sound and feels to it so it gives students a wide range of music to learn as well as experience great composition.
Today I will be showing some tips for “Traumerei” which is a very classic piece of piano repertoire but also very elusive. This piece can really be overlooked by many students who don’t really understand the music in its full sense. There is a beautiful melody but it can be very difficult to know when to pedal. There is also a certain amount of freedom to how you can approach the piece as well.
Even though the piece requires the pedal, it’s always best to practice without the pedal. You should ideally be able to connect as much as possible together with only your hands before employing any pedaling. This is not an easy task and you will find it’s incredibly difficult to string much together with just your hands but this will help you understand where the pedal is actually needed.
The key to this piece is to bring out the singing melody – almost as if it were a vocal part. Every note should be smooth and distinct. By connecting as many notes as you can with your hands will allow you to get the desired effect – then adding the pedal will enhance the music.
The piece has a real ethereal quality to it. The piece has a very interesting composition and it really takes a mature student to grasp many of the finer aspects of the music. You should really do yourself a favor and watch various performances and listen to various recordings of this piece. It’s incredible to see how different performances can be for such a seemingly simple piece of music.
Thanks again for joining me Robert Estrin Robert@LivingPianos.com
Welcome to another part in my ongoing series featuring tips for Schumann’s iconic “Scenes from Childhood”. In part 1 of the series I talked about how this collection of pieces is a perfect choice of repertoire for intermediate to advanced stude
How To Practice the Piano 3 Part Series There are 3 separate skills in learning to play the piano: • Memorizing • Sight Reading • Improvising You can become quite proficient in one or two of these skills and be completely deficient in others. I
When you hear your favorite singer, you know who it is instantly by the voice. Even listening to wind players and string players, you often can identify the player by the tone. What about piano? Can you tell who is playing just from the sound they ge
Welcome to Part 2 in our series on the Chopin G minor Ballade. In Part 1 we discussed how the middle section of this piece requires you to switch your techniques rapidly. We are going to cover the next section which doesn’t get any easier. I’ll provide some tips on how to approach this section and practice techniques that will help you master it.
Let’s discuss this first section:
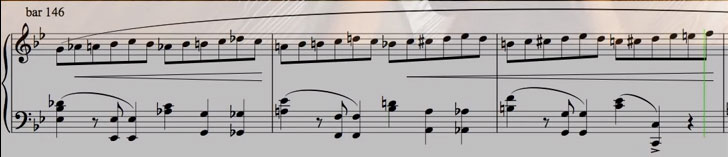
With the right hand, you have a very quick passage that requires a lot of finger work. As I’ve recommended in the past lesson, try taking the passage slowly and working your way up to speed. Start at a comfortable speed and practice with the metronome. Once you have the section down without any issues turn the metronome speed up one notch and start again. Repeat this process until you have the section up to speed. Make sure that you delineate all notes clearly.
Let’s focus now on the left-hand, which has this particular rhythm:

It’s very snappy and precise and you want to bring out the rhythm of this particular section against the fast passage in the right hand. As always I recommend slow practice but in this particular section, I recommend exaggerating the rhythm. Instead of playing the eighth notes as written, play them as sixteenth notes.
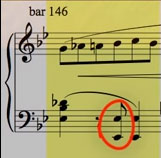
So right here, for example, you can wait an extra sixteenth rest and play the following note as a sixteenth note instead of an eighth note as written. Now why would you want to play the rhythm wrong and not as written? Well, this is only for your slow practice. When the piece gets up to full speed sometimes the eighth notes can sound limp and you want to accentuate the snappy rhythm of these notes. The best way to do this is to wait and play these as sixteenth notes instead of in your slow practice. Once you get this section up to speed, you will be prepared to play these notes quickly enough; you will notice the difference in your playing.
Let’s go on to the next section in this piece:
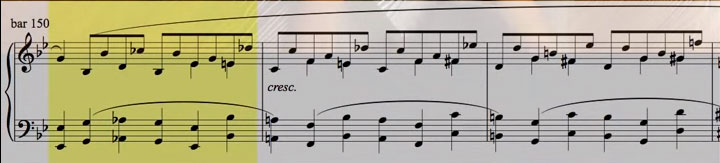
This section is best practiced by playing two-note groups together in the right hand. Once you start to get comfortable in your slow practice you can break up these chords and play the notes as written. Why should you practice this section in chords? Because you can train your fingers to be in the right position before you have to play the notes. Doing this will greatly benefit your finger positions and allow you to be much more comfortable when playing up to tempo.
I hope this has been helpful to you, there will be more tips coming soon. As always if you have any questions please feel free to email or call us directly: Info@LivingPianos.com (949) 244-3729.
Welcome to Part 2 in our series on the Chopin G minor Ballade. In Part 1 we discussed how the middle section of this piece requires you to switch your techniques rapidly. We are going to cover the next section which doesn’t get any easier. I’ll p